Configure with GitHub OAuth
This guide explains how to configure an application with GitHub OAuth as the authentication provider.
Important: GitHub OAuth Apps use OAuth 2.0, not OpenID Connect (OIDC). Therefore, unlike Google, Microsoft Entra ID, and Okta, GitHub does not use an OIDC discovery document or an
id_token. After authorization, the application exchanges the authorization code for an access token and uses GitHub's API to retrieve the authenticated user's profile.
The configuration is completed in the application using the following steps:
- Details
- Connection
- Provisioning & access
- Attribute mapping
- Review
Prerequisites
Before configuring GitHub OAuth, make sure you have:
- Access to the application with permission to configure Identity Providers.
- A GitHub account with permission to create an OAuth App.
- The application's Callback URL / Authorization callback URL.
- The user attributes required by your application.
GitHub's official documentation recommends requesting only the scopes required by the application. See GitHub OAuth Apps and Scopes for OAuth apps.
Step 1: Create a GitHub OAuth App
First, create an OAuth App in GitHub. The OAuth App provides the Client ID and Client Secret that your application uses during the OAuth authorization flow.
1.1 Open GitHub Developer Settings
Sign in to GitHub.
Open:
Profile picture → Settings → Developer settings → OAuth Apps
Then select:
New OAuth App
GitHub documents this process in Creating an OAuth app.
1.2 Enter application details
Configure the following fields:
| GitHub field | Value |
|---|---|
| Application name | A recognizable name for your application |
| Homepage URL | The public URL of your application |
| Application description | Optional description |
| Authorization callback URL | The callback URL provided by your application |
Example:
Application name:
My Application

Homepage URL:
https://example.com

Authorization callback URL:
https://example.com/auth/github/callback
For local development, the callback URL may look like:
http://localhost:3000/auth/github/callback
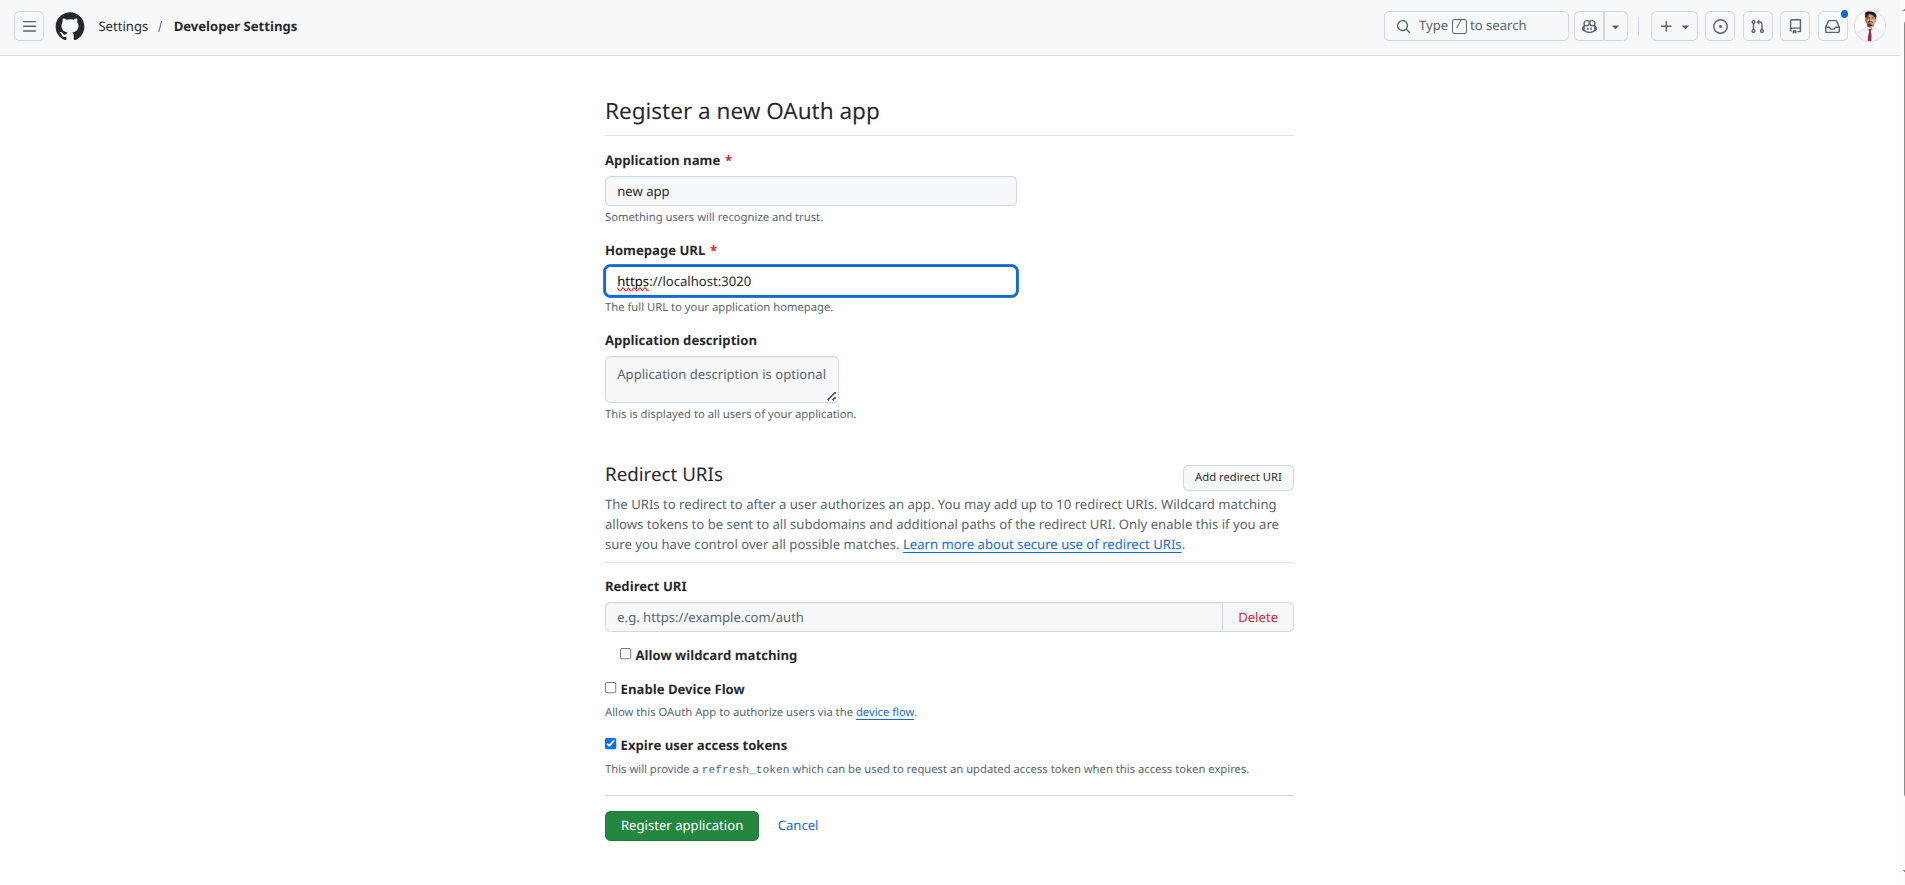
GitHub OAuth Apps support one callback URL in the OAuth App configuration. Make sure the configured callback URL matches the value used by your application.
See GitHub's Creating an OAuth app.
Select Register application.
Step 2: Get the Client ID and Client Secret
After registering the OAuth App, GitHub displays the application's configuration page.
Locate:
- Client ID
- Client Secret
If the client secret has not been generated, select:
Generate a new client secret
Copy the values.
Example:
Client ID:
Iv1.xxxxxxxxxxxxxxxx

Client Secret:
xxxxxxxxxxxxxxxxxxxxxxxxxxxxxxxxxxxxxxxx
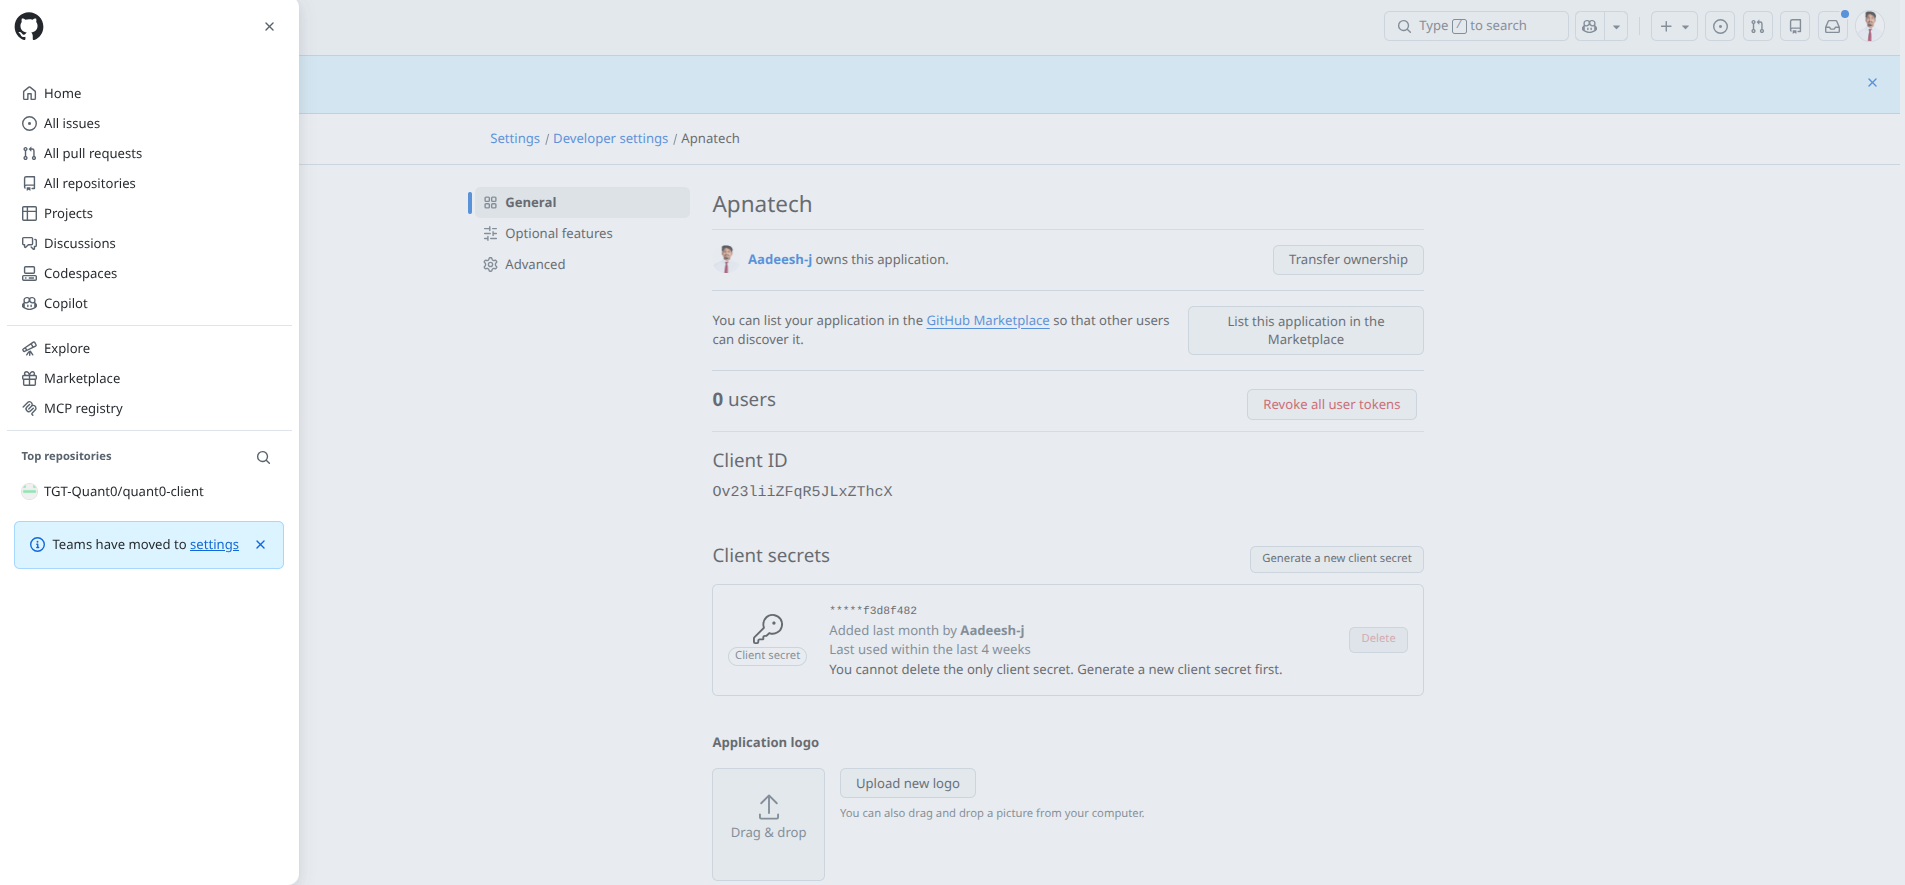
Keep the Client Secret secure. Never commit it to source control or expose it in frontend/client-side code.
GitHub OAuth Apps use the Client ID and Client Secret during the authorization-code exchange. See Authorizing OAuth apps.
Step 3: Configure the Identity Provider in the Application
Open the application's Identity Providers section and create a new provider.
Select:
Identity Provider → OAuth → GitHub
The configuration wizard opens with the following steps:
- Details
- Connection
- Provisioning & access
- Attribute mapping
- Review
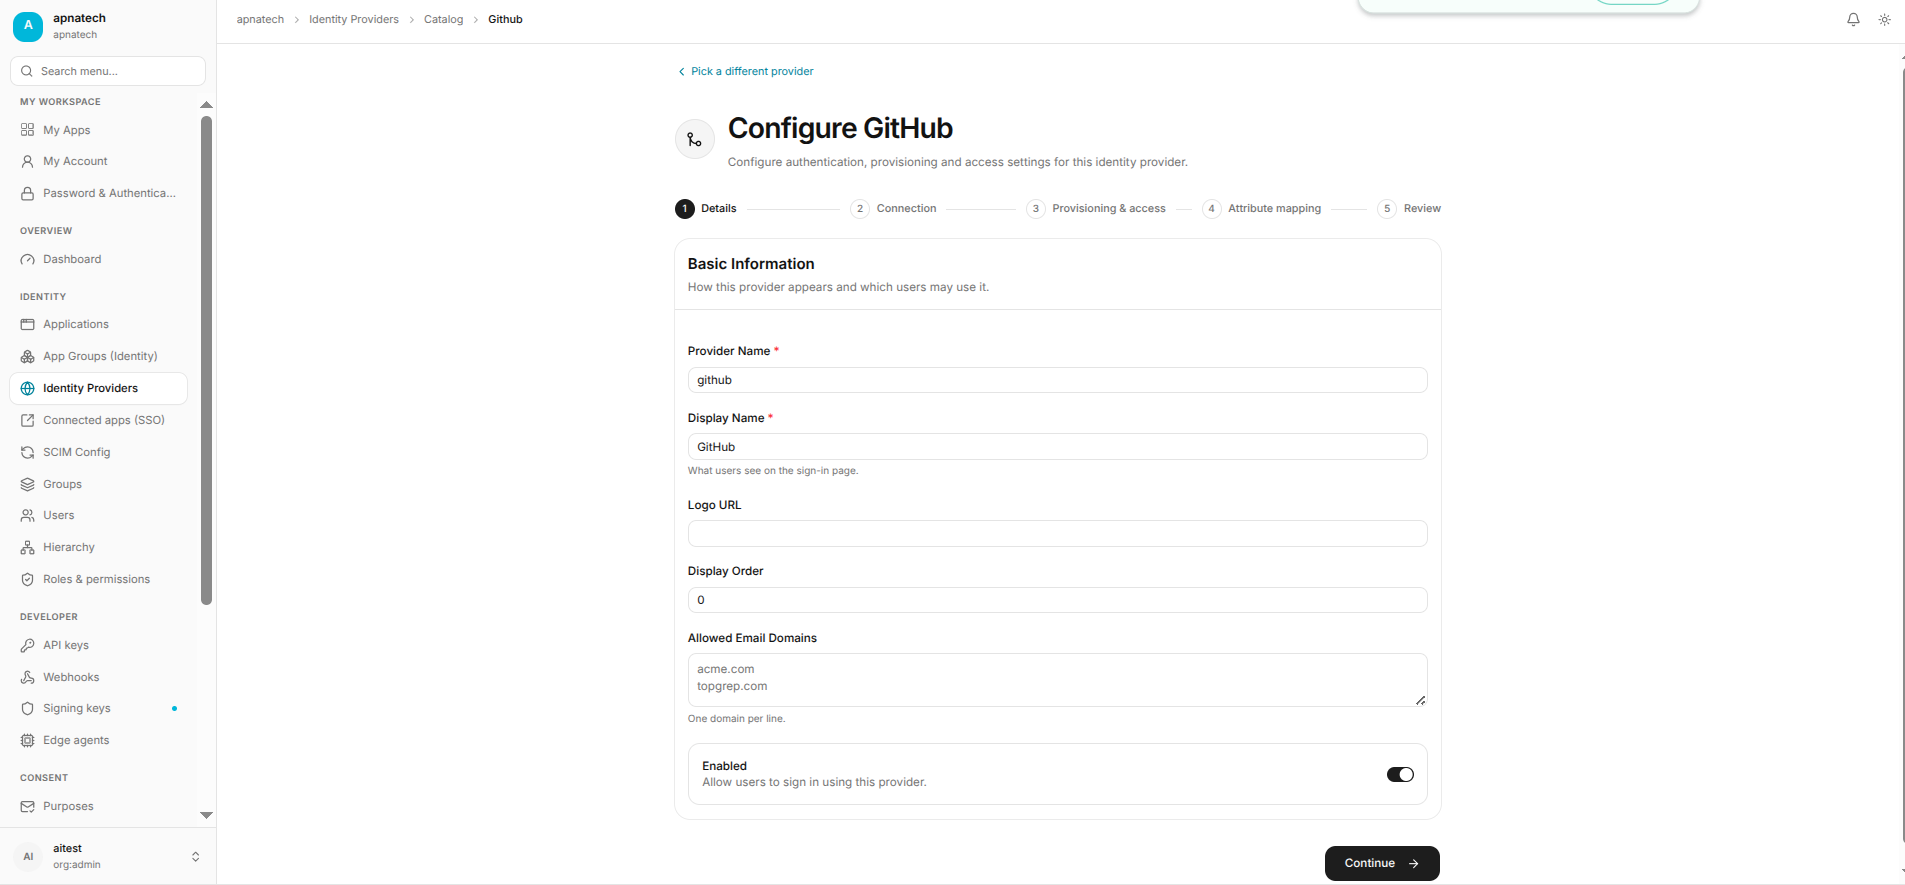
Step 3.1: Details
The Details step contains the basic information about the Identity Provider.
Example:
| Field | Value |
|---|---|
| Name | GitHub |
| Provider type | OAuth |
| Description | GitHub OAuth |
If the application provides an Enabled option, enable the provider when you are ready to make it available to users.
Click Continue.
Step 4: Connection
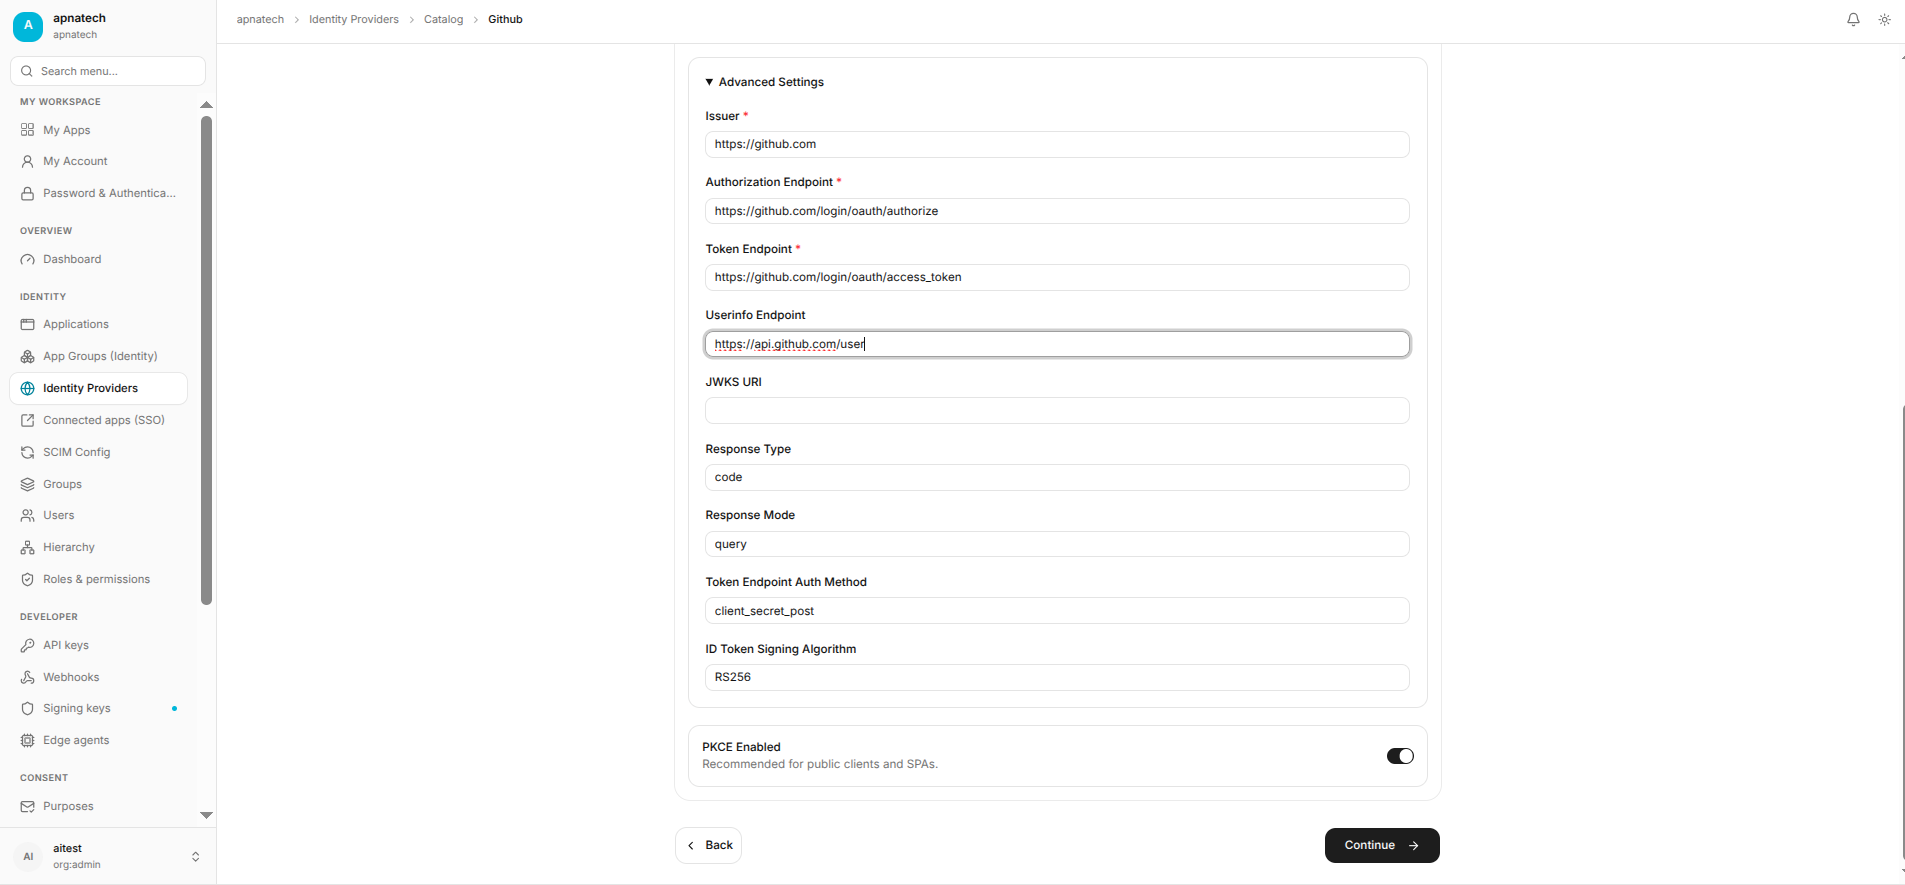
The Connection step contains the GitHub OAuth configuration.
Configure the following values:
| Application field | GitHub OAuth value |
|---|---|
| Issuer | https://github.com |
| Authorization Endpoint | https://github.com/login/oauth/authorize |
| Token Endpoint | https://github.com/login/oauth/access_token |
| User API Endpoint | https://api.github.com/user |
| Email API Endpoint | https://api.github.com/user/emails |
| Client ID | Client ID created in GitHub |
| Client Secret | Client Secret created in GitHub |
| Scopes | read:user user:email |
GitHub documents the OAuth authorization flow and token exchange in Authorizing OAuth apps.
4.1 Authorization Endpoint
Use:
https://github.com/login/oauth/authorize
The application redirects the user to this endpoint to request authorization.
The authorization request normally includes:
client_idredirect_uriscopestate
Example:
https://github.com/login/oauth/authorize
  ?client_id=<CLIENT_ID>
  &redirect_uri=<CALLBACK_URL>
  &scope=read:user%20user:email
  &state=<STATE>
Always use and validate a
statevalue to protect the authorization flow against CSRF attacks.
4.2 Token Endpoint
Use:
https://github.com/login/oauth/access_token
After the user authorizes the application, GitHub redirects the user to the callback URL with an authorization code.
The application exchanges that code for an access token using the Client ID and Client Secret.
GitHub documents this authorization-code exchange in its OAuth Apps documentation.
4.3 User API Endpoint
Use:
https://api.github.com/user
After obtaining an access token, the application calls this endpoint to retrieve the authenticated GitHub user's profile.
GitHub documents this endpoint in REST API endpoints for users.
4.4 Email API Endpoint
Use:
https://api.github.com/user/emails
This endpoint can be used to retrieve the authenticated user's email addresses.
For OAuth Apps, the user:email scope is required to access the user's email addresses through this endpoint.
See REST API endpoints for emails.
Step 5: Configure OAuth Scopes
For basic GitHub login and email retrieval, use:
read:user user:email
The scopes provide:
| Scope | Purpose |
|---|---|
read:user | Read the authenticated user's profile |
user:email | Read the authenticated user's email addresses |
GitHub recommends requesting only the scopes required by your application. See Scopes for OAuth apps.
Do not request the
reposcope unless your application actually needs access to repositories. Thereposcope provides broad access to public and private repository resources.
Click Continue.
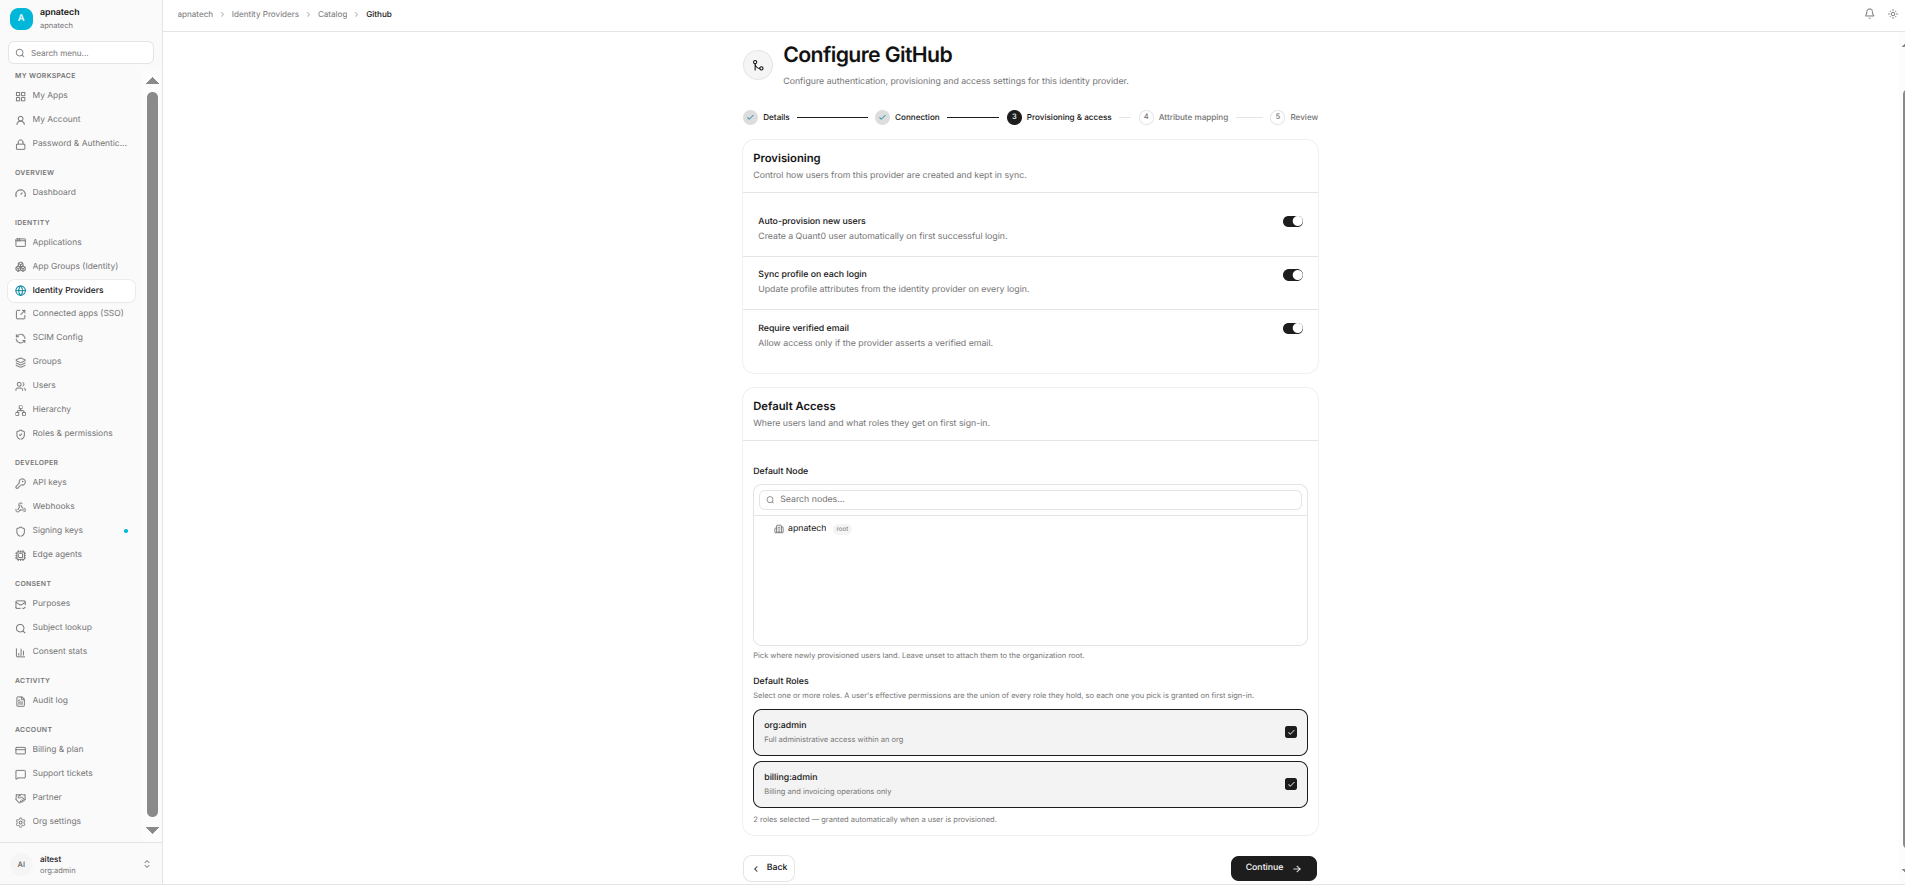
Step 6: Provisioning & Access
The Provisioning & access step controls which GitHub users can use the provider and how users are created or matched in the application.
Typical configuration:
| Setting | Recommended configuration |
|---|---|
| Provider status | Enabled |
| User access | Allow required users |
| Account creation | Enable if JIT provisioning is supported |
| Existing user matching | Use a stable GitHub identifier |
Just-in-time provisioning
If your application supports Just-in-Time (JIT) provisioning, a user can be created automatically the first time they authenticate through GitHub.
If JIT provisioning is disabled, users may need to be created or assigned manually before they can sign in.
The exact provisioning fields depend on your application.
Click Continue.
Step 7: Attribute Mapping
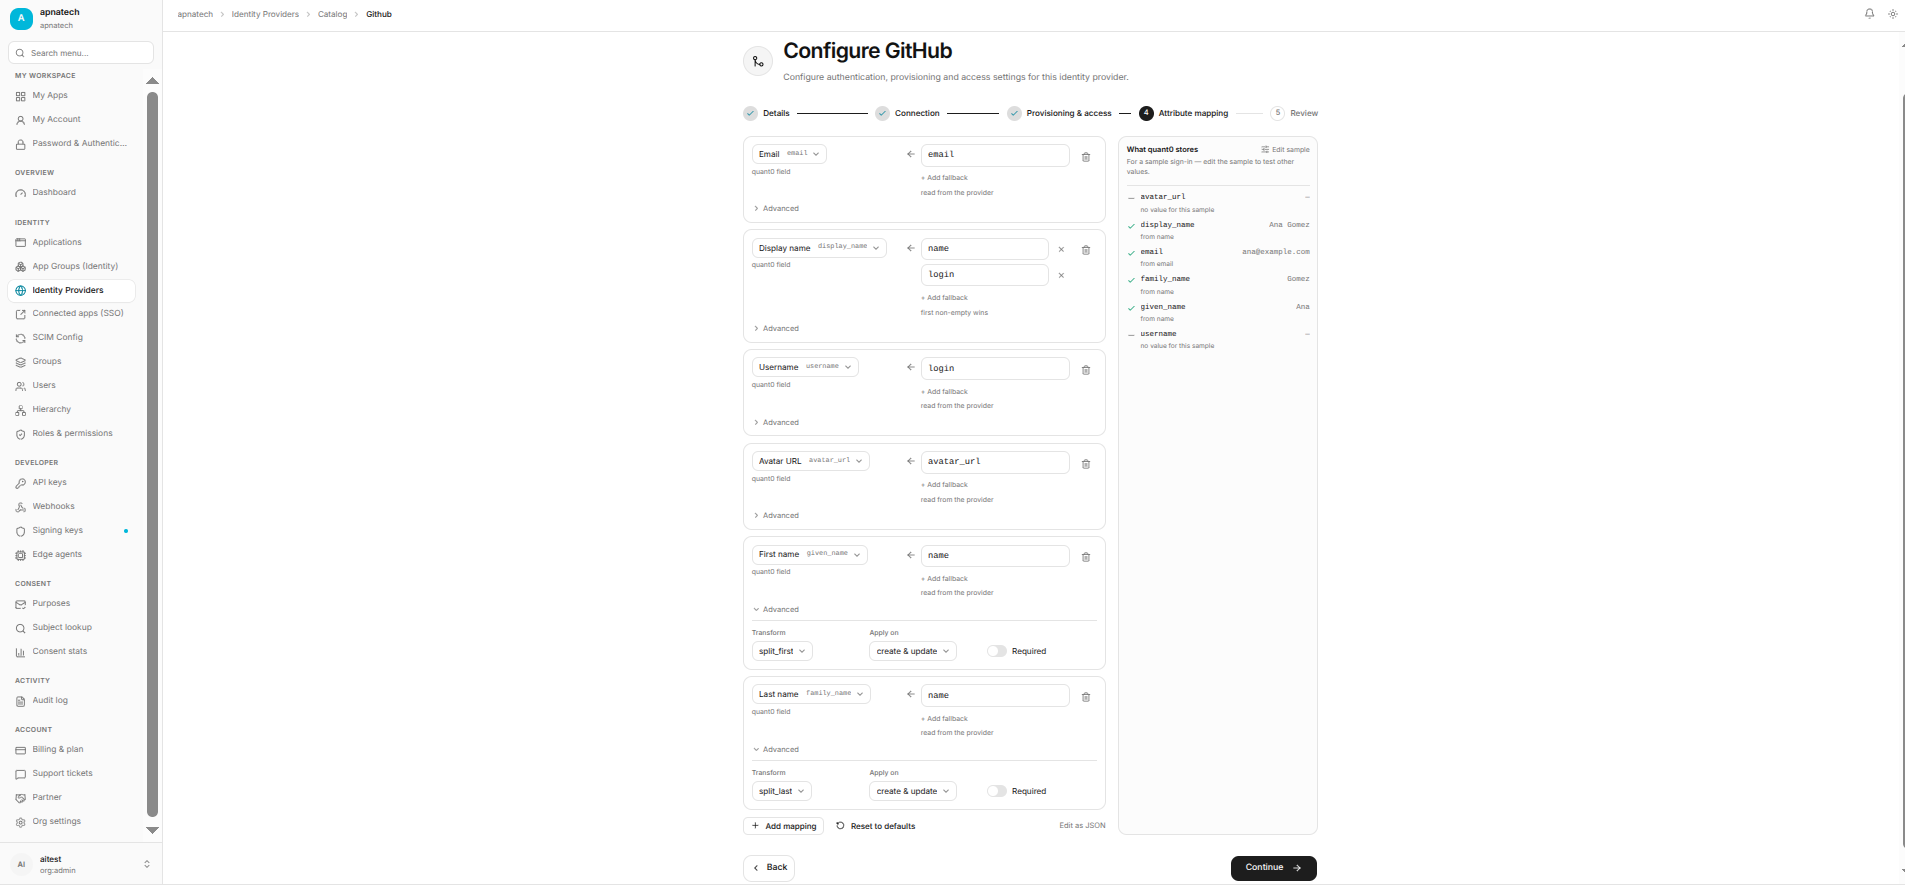
GitHub OAuth does not return a standard OIDC ID token. Instead, the application retrieves user information from GitHub's REST API.
A typical response from:
GET https://api.github.com/user
contains fields such as:
{
  "id": 12345678,
  "login": "octocat",
  "name": "The Octocat",
  "avatar_url": "https://avatars.githubusercontent.com/...",
  "email": "octocat@example.com"
}
A typical application mapping is:
| Application attribute | GitHub value | Purpose |
|---|---|---|
| User ID / External ID | id | Stable GitHub user identifier |
| Username | login | GitHub username |
email | User email, when available | |
| Display name | name | User display name |
| Profile picture | avatar_url | User avatar |
Recommended mapping:
id          → User ID / External ID
login       → Username
email       → Email
name        → Display Name
avatar_url  → Profile Picture
Important: Use GitHub id as the stable identifier
Use the GitHub user's numeric id as the external identity identifier when your application's identity model supports it.
Do not use the display name as a unique identifier.
The GitHub user endpoint documents the authenticated user's profile information. See REST API endpoints for users.
Email mapping
The email field returned by GET /user may be null when the user's primary email is not publicly available.
If your application requires the user's email address, use:
GET https://api.github.com/user/emails
with the user:email scope.
The email endpoint returns information such as:
[
  {
    "email": "user@example.com",
    "verified": true,
    "primary": true,
    "visibility": "private"
  }
]
The application can select the verified primary email according to its user-account policy.
See GitHub email API documentation.
Click Continue.
Step 8: Review
The Review step displays the configuration before the Identity Provider is saved.
Verify the following.
Details
- Provider name is correct.
- Provider type is OAuth.
- Provider is enabled if required.
Connection
- Authorization Endpoint is correct.
- Token Endpoint is correct.
- User API Endpoint is correct.
- Email API Endpoint is correct, if email retrieval is required.
- Client ID matches the GitHub OAuth App.
- Client Secret is correct.
- Required scopes are configured.
Provisioning & access
- The correct users have access.
- JIT provisioning is configured according to your requirements.
- Existing-user matching is configured correctly.
Attribute mapping
Verify:
id          → User ID / External ID
login       → Username
email       → Email
name        → Display Name
avatar_url  → Profile Picture
Select Save, Create, or Finish, depending on your application's UI.
Step 9: Test GitHub OAuth Login
After saving the configuration, test the authentication flow.
- Open the application's login page.
- Select Sign in with GitHub.
- The application redirects the user to GitHub.
- GitHub displays the authorization screen.
- Review the permissions requested by the application.
- Select Authorize.
- GitHub redirects the user to the application's callback URL.
- The application receives the authorization
code. - The application exchanges the code for an access token.
- The application calls the GitHub user API.
- The application creates or signs in the user.
- Verify that the mapped attributes are correct.
Expected result
After successful authentication:
- The user is redirected back to the application.
- The user is authenticated.
- GitHub profile information is retrieved.
- The configured attributes are mapped to the application user.
- The user receives the access configured in Provisioning & access.
OAuth Flow
The GitHub OAuth flow can be summarized as:
User
  │
  │ Select "Sign in with GitHub"
  ▼
Application
  │
  │ Redirect to GitHub authorization endpoint
  ▼
GitHub
  │
  │ User authorizes application
  ▼
Application Callback URL
  │
  │ Authorization code
  ▼
GitHub Token Endpoint
  │
  │ Access token
  ▼
Application
  │
  │ GET /user
  │ GET /user/emails
  ▼
GitHub API
  │
  │ User profile
  ▼
Application
  │
  │ Create / sign in user
  ▼
Authenticated User
GitHub documents the authorization-code flow in Authorizing OAuth apps.
Troubleshooting
Callback URL mismatch
Verify that the application's callback URL exactly matches the Authorization callback URL configured in the GitHub OAuth App.
Check:
- Protocol (
httpvshttps) - Domain
- Port
- Path
- Trailing slash
- Local vs production callback URL
Open:
GitHub → Settings → Developer settings → OAuth Apps → Your OAuth App
Then verify the Authorization callback URL.
bad_verification_code
This usually indicates that the authorization code is invalid, expired, already used, or otherwise cannot be exchanged.
Check that:
- The code is sent to the token endpoint only once.
- The Client ID is correct.
- The Client Secret is correct.
- The callback flow is not being retried with the same code.
incorrect_client_credentials
Check:
- Client ID.
- Client Secret.
- GitHub OAuth App configuration.
- Environment variables used by the application.
Never expose the Client Secret in browser code.
User email is missing
The GitHub /user endpoint can return a null email.
If your application requires the user's email:
- Request the
user:emailscope. - Call:
GET https://api.github.com/user/emails
- Select the appropriate verified email according to your application's policy.
See GitHub email API.
User is authenticated but not created
Check the Provisioning & access configuration.
If JIT provisioning is enabled, verify that the GitHub user is allowed to access the application.
If users must be assigned manually, verify the user's access.
Insufficient permissions
Check the OAuth scopes requested by the application.
For basic authentication:
read:user user:email
Do not request broader scopes unless they are required.
See GitHub OAuth scopes.
Security Recommendations
Use the state parameter
Always generate a unique state value for the OAuth authorization request and verify it when the user returns to the callback URL.
This helps protect the authorization flow against CSRF attacks.
Request minimal scopes
Only request the permissions required by your application.
For basic login and email retrieval:
read:user user:email
GitHub recommends using minimal scopes to reduce the impact if an OAuth token is compromised. See GitHub OAuth app best practices.
Protect the Client Secret
The Client Secret must remain server-side.
Do not:
- Put it in frontend JavaScript.
- Commit it to Git.
- Add it to public documentation.
- Send it to the browser.