Configure an Application with Microsoft Entra ID OIDC
This guide explains how to configure an application with Microsoft Entra ID (formerly Azure AD) as an OpenID Connect (OIDC) Identity Provider (IdP).
The configuration is completed in the application using the following steps:
- Details
- Connection
- Provisioning & access
- Attribute mapping
- Review
Prerequisites
Before configuring Microsoft Entra ID OIDC, make sure you have:
- Access to the application with permission to configure Identity Providers.
- Access to a Microsoft Entra tenant.
- Permission to register an application in Microsoft Entra ID.
- The application's Redirect URI / Callback URL.
- The user attributes required by your application.
For Microsoft Entra application registration, see the official Microsoft Learn - Register an application.
Step 1: Register the Application in Microsoft Entra ID
Microsoft Entra ID requires an application registration before your application can use Microsoft as an OIDC Identity Provider.
1.1 Open Microsoft Entra admin center
Open the Microsoft Entra admin center.
Go to:
Entra ID → App registrations → New registration
Microsoft's current application registration flow is documented in Register an application with the Microsoft identity platform.
1.2 Enter application details
Enter a recognizable name for the application.
For Supported account types, choose the option that matches your application's requirements.
Common options include:
| Account type | Use when |
|---|---|
| Accounts in this organizational directory only | Users from one Microsoft Entra tenant should sign in |
| Accounts in any organizational directory | Users from multiple Microsoft Entra tenants should sign in |
| Accounts in any organizational directory and personal Microsoft accounts | Both work/school and personal Microsoft accounts should be supported |
| Personal Microsoft accounts | Only personal Microsoft accounts should be supported |
The supported account type determines the {tenant} value used by the Microsoft OIDC endpoints.
Select Register.
After registration, Microsoft Entra ID displays the application's:
- Application (client) ID
- Directory (tenant) ID
- Object ID
You will use the Application (client) ID and Directory (tenant) ID when configuring the application.
Step 2: Configure the Redirect URI
The Redirect URI is the URL where Microsoft Entra ID sends the authentication response after the user signs in.
The Redirect URI configured in Microsoft Entra ID must match the URI used by your application.
2.1 Open Authentication settings
In your Microsoft Entra application registration, go to:
Manage → Authentication
Select:
Add a platform → Web
For a server-side web application, Microsoft recommends the Web platform.
Microsoft documents this process in How to add a redirect URI to your application.
2.2 Add the application's Redirect URI
Enter the exact callback URL provided by your application.
Example:
https://<your-application-domain>/<your-oidc-callback-path>
For local development, it may look like:
http://localhost:3000/<your-oidc-callback-path>
Use the exact value provided by your application.
The Redirect URI must match the URI registered in Microsoft Entra ID. Differences in protocol, domain, port, path, or other URI components can cause authentication failures.
Microsoft provides additional Redirect URI restrictions and best practices.
Select Configure or Save.
Step 3: Create a Client Secret
For a confidential web application, create a client secret that the application can use to authenticate with Microsoft Entra ID.
3.1 Open Certificates & secrets
In the Microsoft Entra application registration, go to:
Manage → Certificates & secrets
Under Client secrets, select:
New client secret
Enter:
- Description – A recognizable name, such as
OIDC Production. - Expiration – Choose an appropriate expiration period according to your organization's security policy.
Select Add.
3.2 Copy the secret value
Immediately copy the Value of the client secret.
Store it securely.
The client secret value is displayed only when the secret is created. Do not expose it in frontend code, documentation, source control, or public repositories.
Microsoft recommends stronger credential types such as certificates or federated credentials for production scenarios where appropriate. See Microsoft identity platform application authentication.
Step 4: Configure the Identity Provider in the Application
Open the application's Identity Providers section and create a new provider.
Select:
Identity Provider → OIDC → Microsoft
The configuration wizard opens.
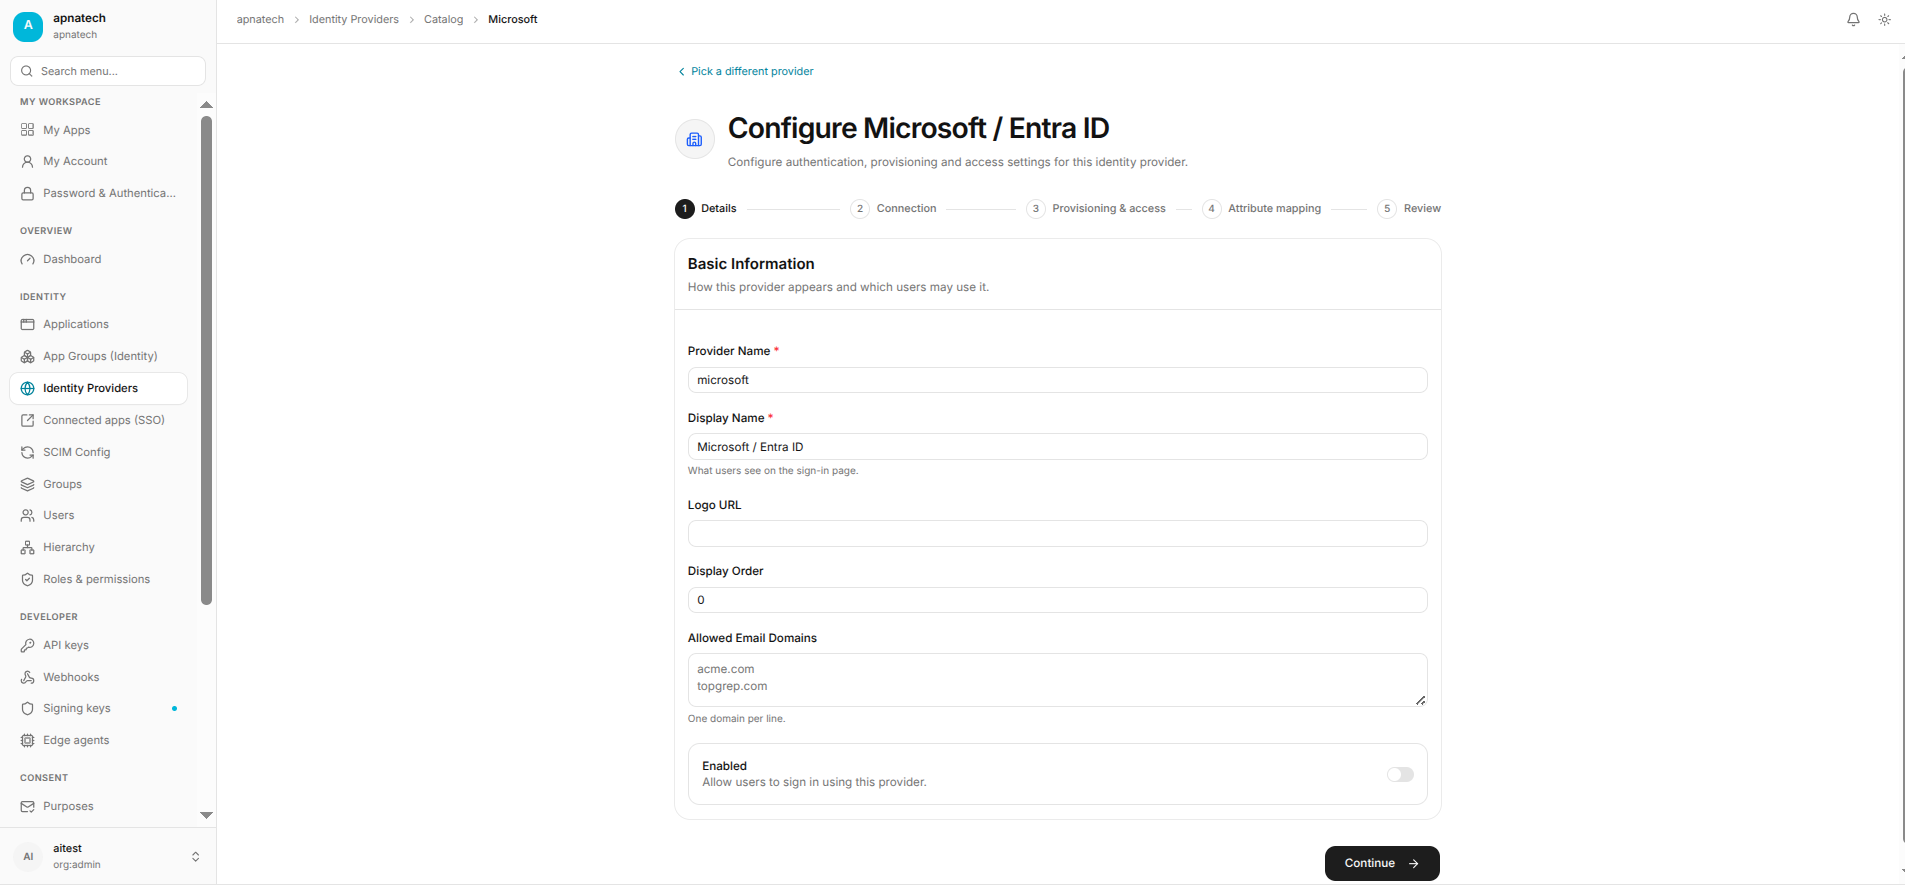
Step 4.1: Details
The Details step contains the basic information about the Identity Provider.
Example:
| Field | Value |
|---|---|
| Name | Microsoft Entra ID |
| Provider type | OIDC |
| Description | Microsoft Entra ID OpenID Connect |
If your application provides an Enabled option, enable the provider when you are ready to make it available to users.
Click Continue.
Step 5: Connection
The Connection step contains the Microsoft Entra OIDC connection settings.
5.1 Configure the Issuer / Discovery URL
Microsoft Entra OIDC endpoints are tenant-dependent.
Use the following discovery URL format:
https://login.microsoftonline.com/<tenant>/v2.0/.well-known/openid-configuration
Replace <tenant> with the appropriate value:
- Tenant ID, for a specific tenant.
- Tenant domain, such as
contoso.onmicrosoft.com. organizations, for work/school accounts across organizational tenants.common, when the application supports both organizational and personal Microsoft accounts.
For example:
https://login.microsoftonline.com/<tenant-id>/v2.0/.well-known/openid-configuration
Microsoft documents these OIDC discovery options in OpenID Connect on the Microsoft identity platform.
Recommended option: Use OIDC Discovery
If your application supports an OIDC Discovery URL, use:
https://login.microsoftonline.com/<tenant>/v2.0/.well-known/openid-configuration
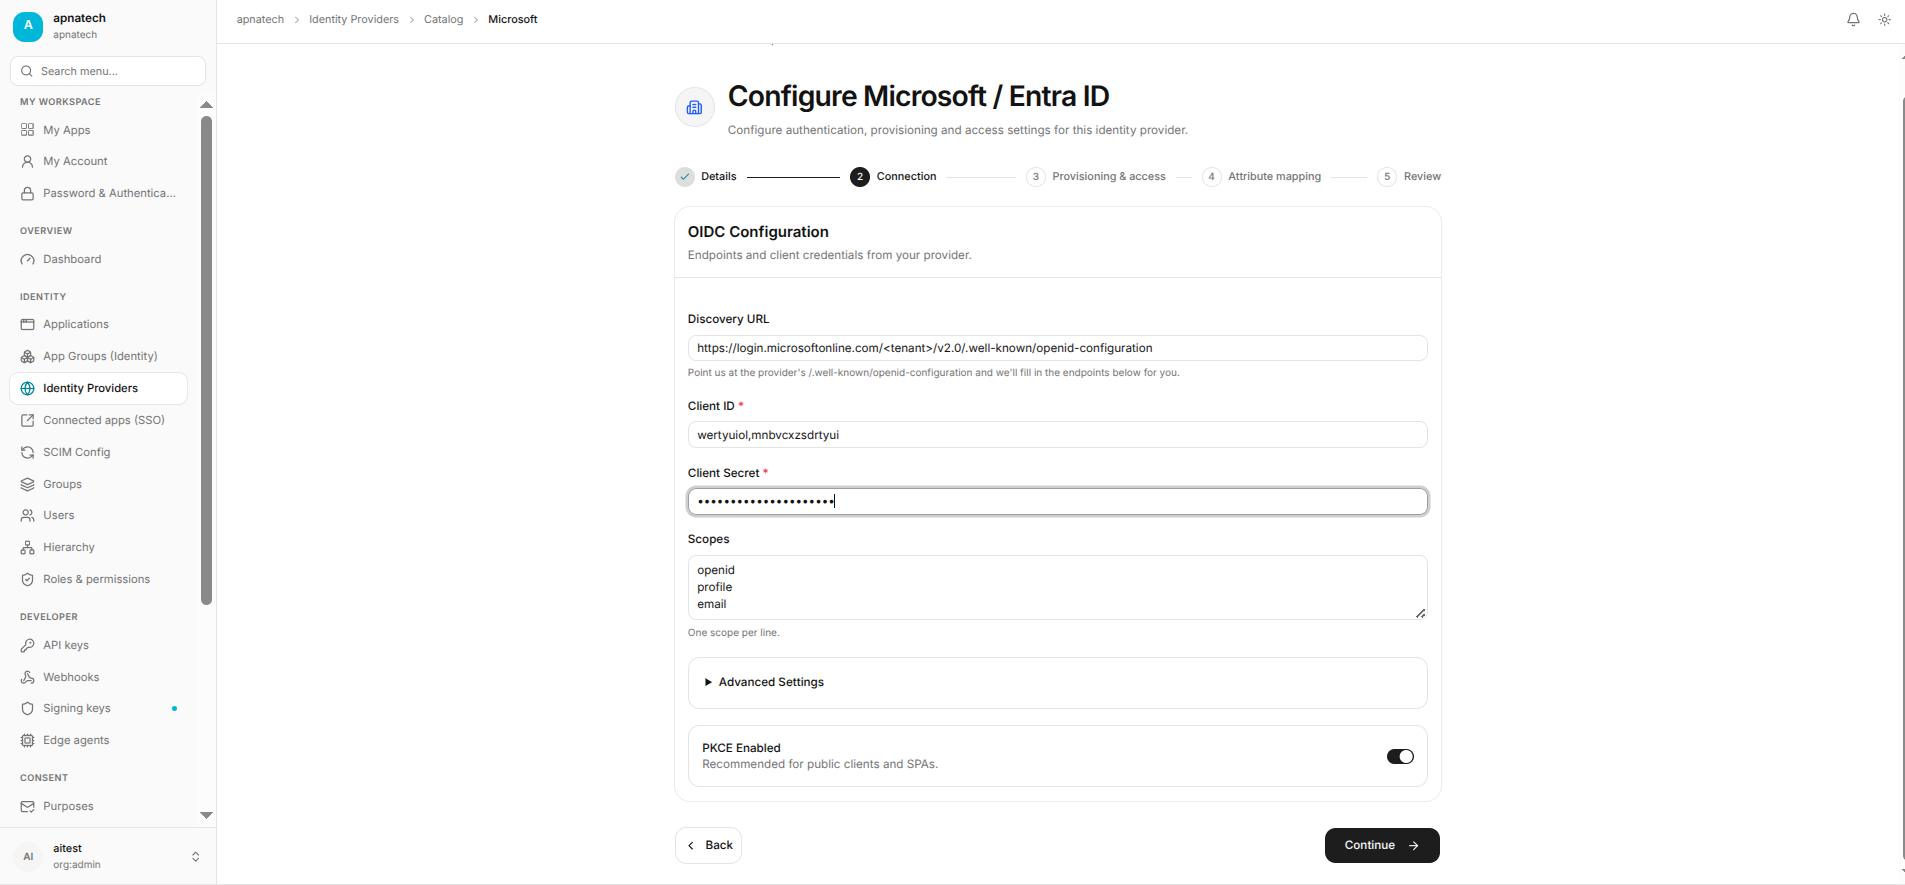
Using discovery allows the application to retrieve the correct authorization endpoint, token endpoint, signing keys, and other provider metadata automatically.
5.2 Configure the OIDC endpoints
If your application requires the endpoints individually, use the following format:
| Application field | Microsoft Entra OIDC value |
|---|---|
| Issuer | https://login.microsoftonline.com/<tenant>/v2.0 |
| Discovery URL | https://login.microsoftonline.com/<tenant>/v2.0/.well-known/openid-configuration |
| Authorization Endpoint | https://login.microsoftonline.com/<tenant>/oauth2/v2.0/authorize |
| Token Endpoint | https://login.microsoftonline.com/<tenant>/oauth2/v2.0/token |
| UserInfo Endpoint | https://graph.microsoft.com/oidc/userinfo |
| Client ID | Application (client) ID from Microsoft Entra |
| Client Secret | Client secret created in Microsoft Entra |
| Scopes | openid profile email |
Replace <tenant> with the tenant value used by your application.
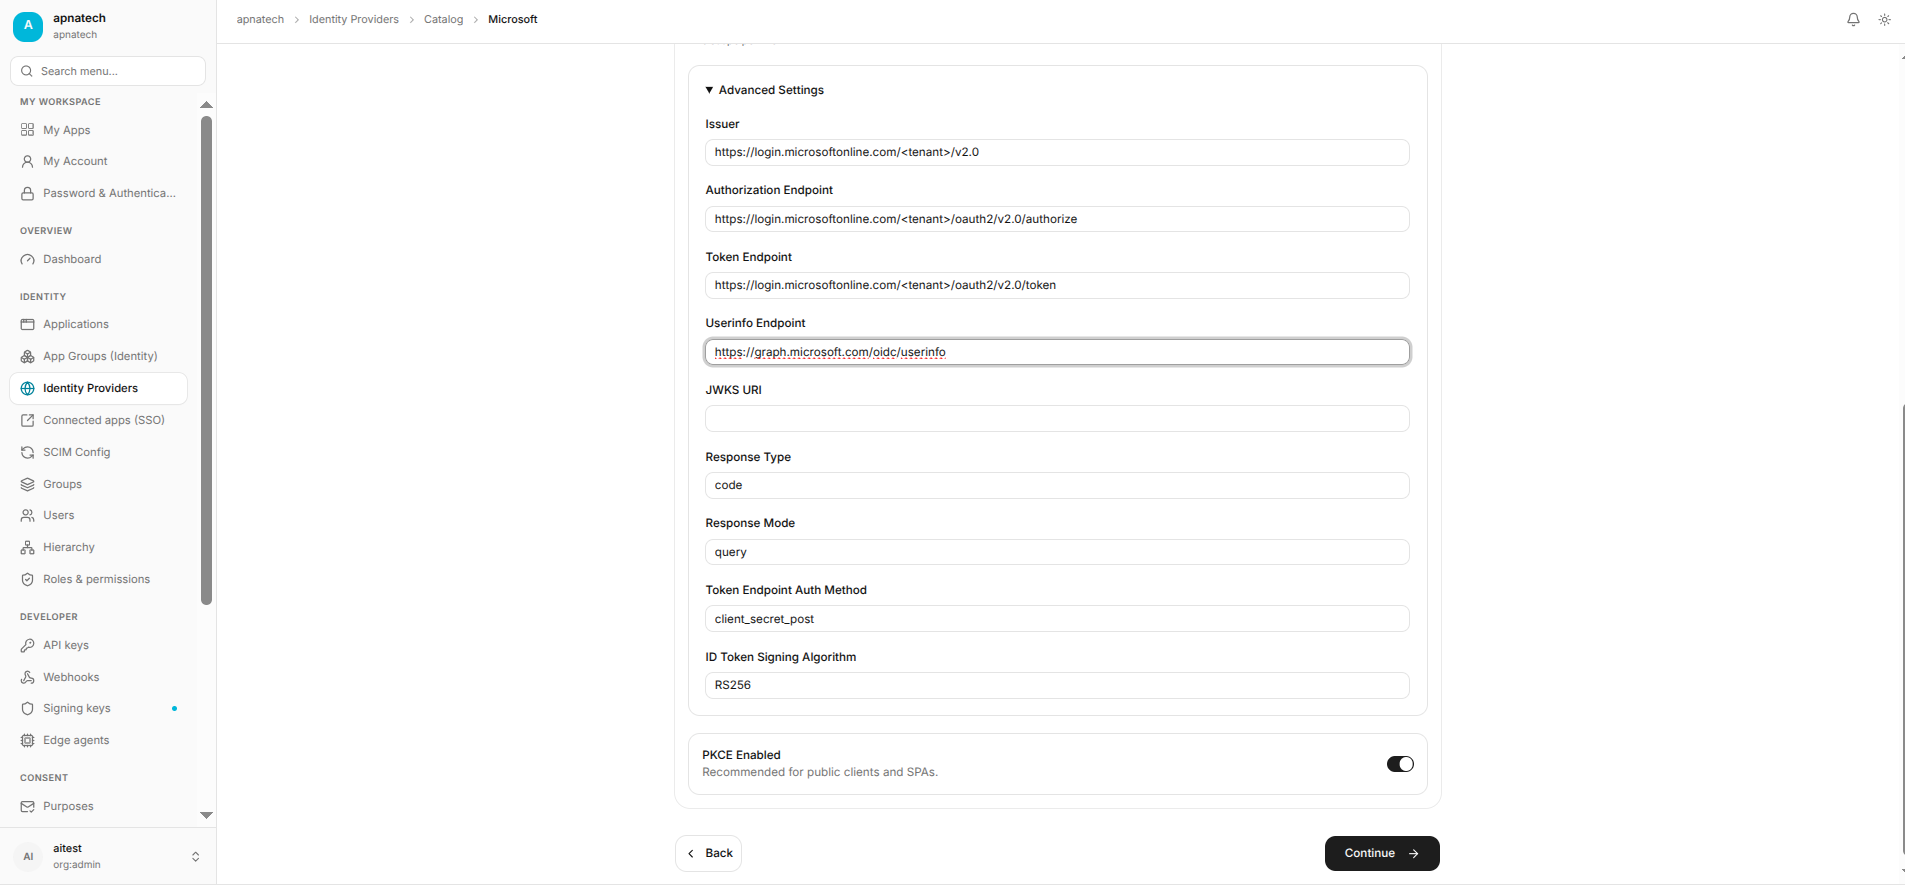
Microsoft's official OIDC documentation lists the discovery, authorization, token, UserInfo, JWKS, and logout endpoints. See Microsoft identity platform OIDC endpoint .
5.3 Configure scopes
For standard OIDC authentication, configure:
openid profile email
The scopes provide the application with the OIDC identity information required for authentication.
openid– Required for OpenID Connect authentication.profile– Requests standard profile claims.email– Requests the user's email claim when available.
Microsoft Entra ID can return claims in the ID token and UserInfo response depending on the requested scopes and account configuration.
Click Continue.
Step 6: Provisioning & Access
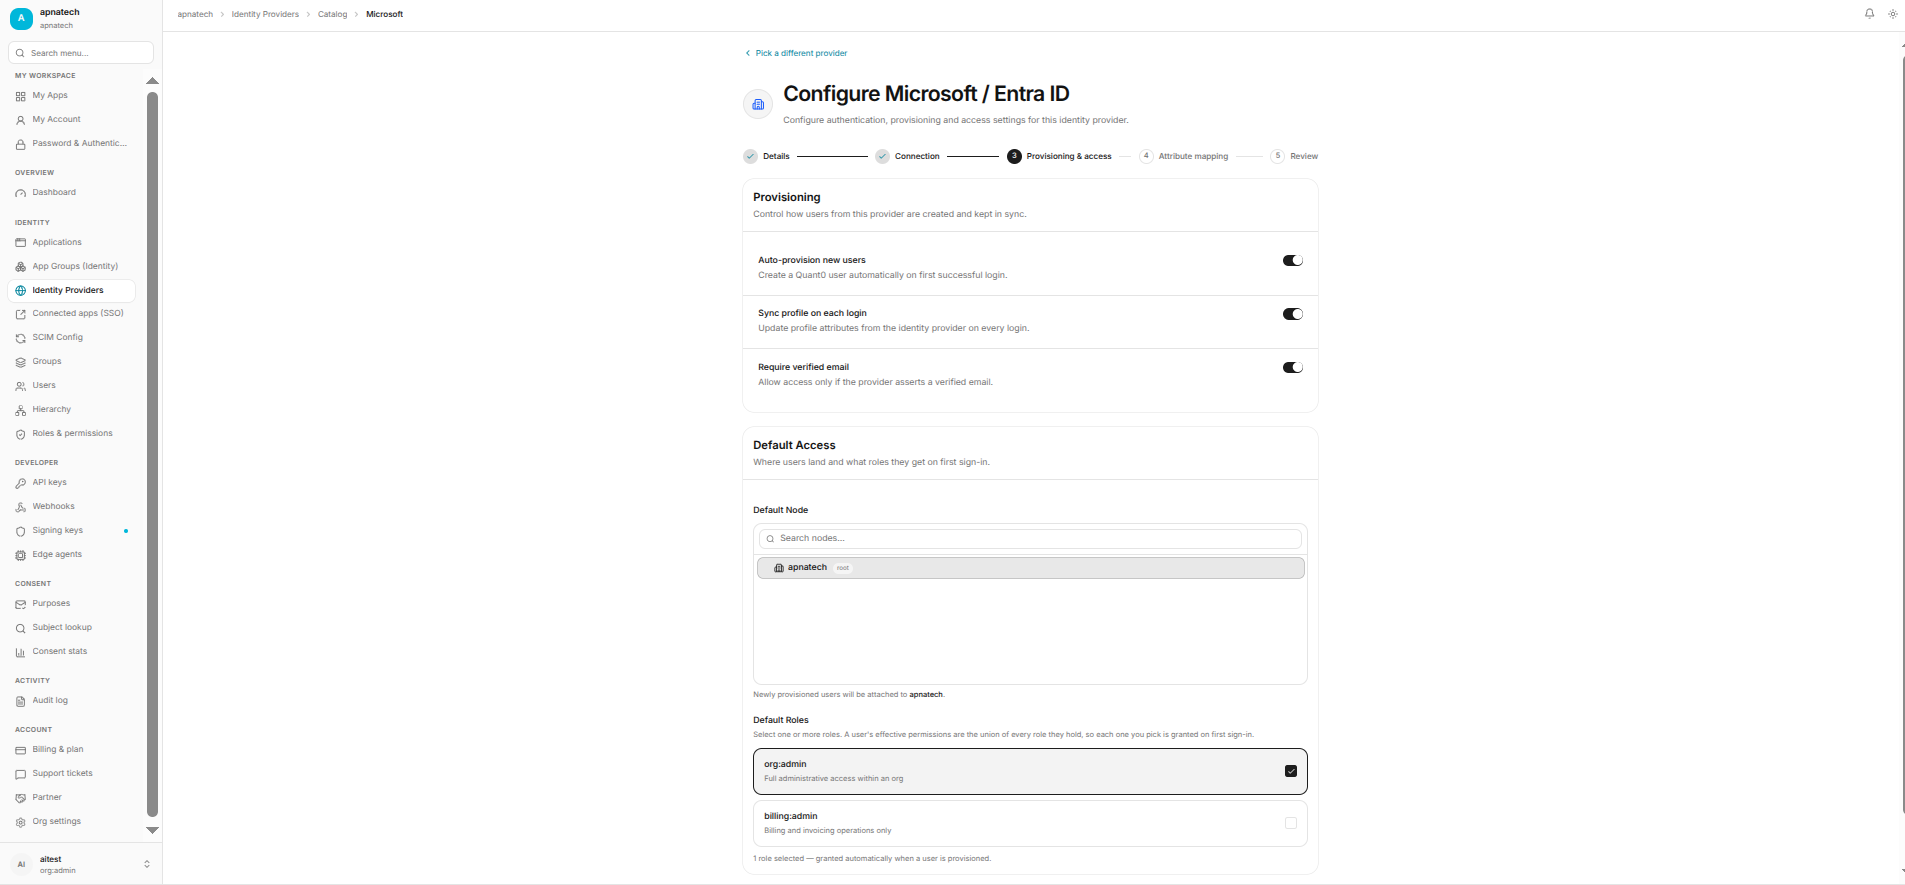
The Provisioning & access step controls who can use the Microsoft Entra Identity Provider and how users are created in the application.
Configure these settings according to your application's access model.
Typical configuration:
| Setting | Recommended configuration |
|---|---|
| Provider status | Enabled |
| User access | Allow required users/groups |
| Account creation | Enable if JIT provisioning is supported |
| Existing user matching | Use the application's supported stable identifier or verified email |
Just-in-time provisioning
If your application supports Just-in-Time (JIT) provisioning, a user can be created automatically when they authenticate through Microsoft Entra ID for the first time.
If JIT provisioning is disabled, users may need to be created or assigned manually before they can sign in.
The exact fields available in this step depend on your application.
Click Continue.
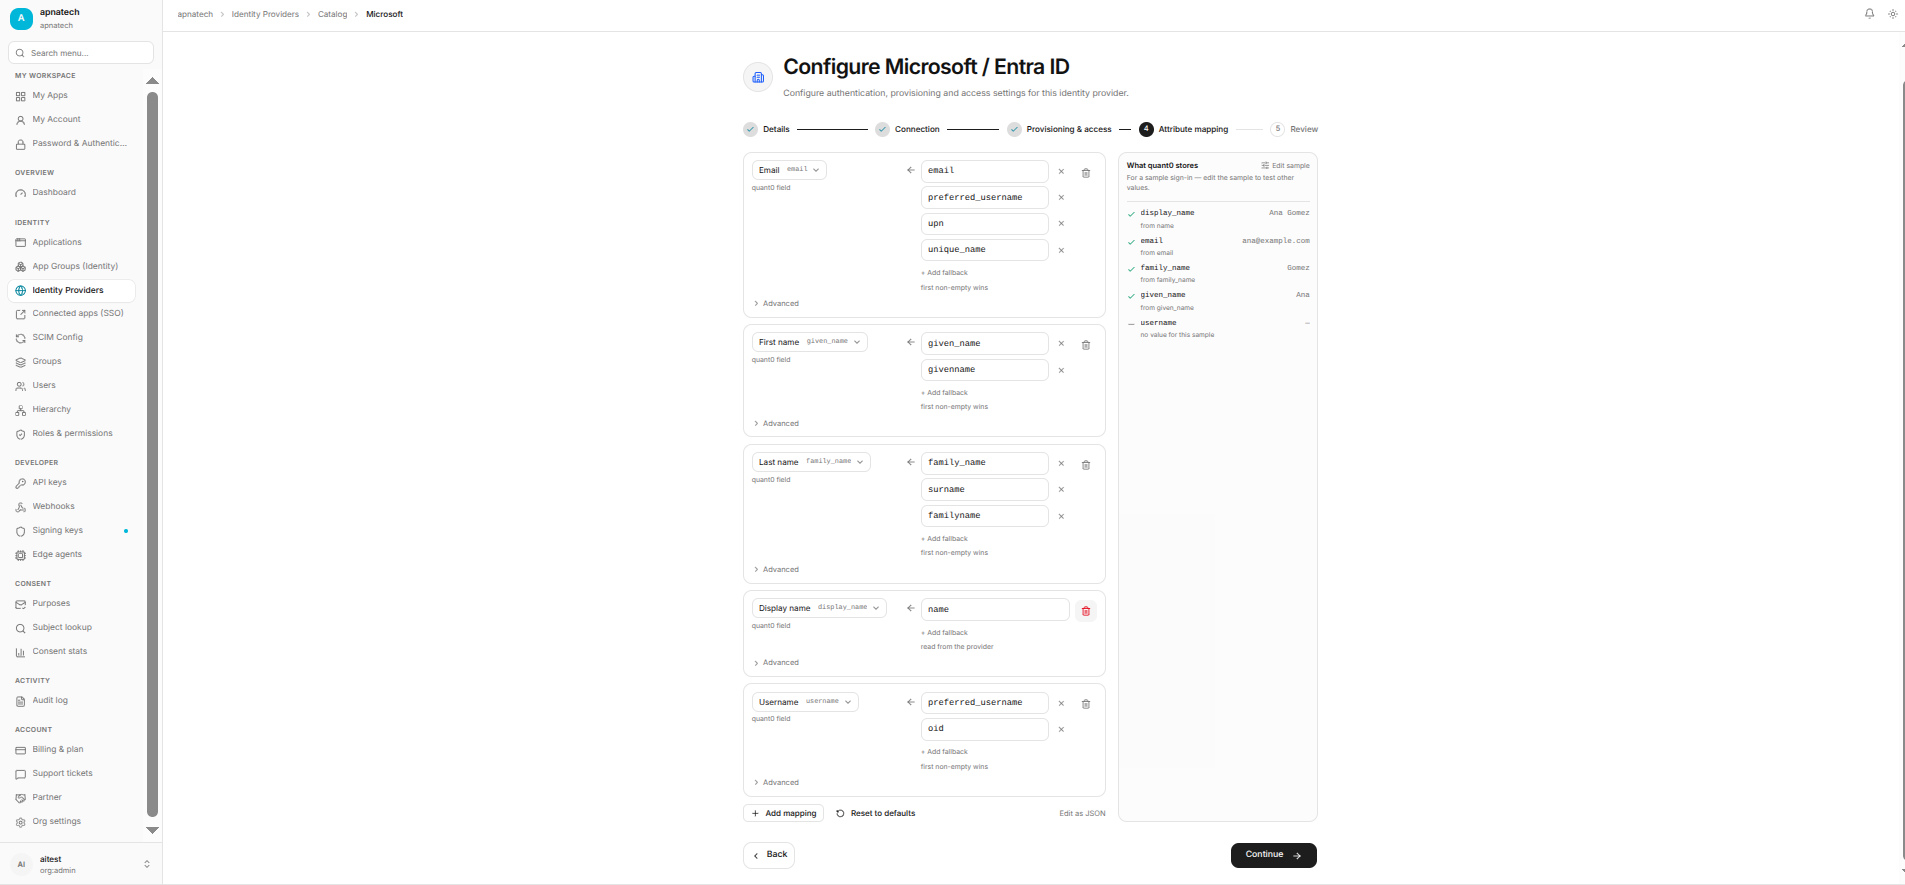
Step 7: Attribute Mapping
The Attribute mapping step maps claims received from Microsoft Entra ID to user attributes in your application.
A typical OIDC mapping is:
| Application attribute | Microsoft OIDC claim | Purpose |
|---|---|---|
| User ID / External ID | sub | Stable subject identifier |
email | User email address | |
| First name | given_name | User first name |
| Last name | family_name | User last name |
| Display name | name | User display name |
| Preferred username | preferred_username | Common sign-in identifier |
| Profile picture | - | Not normally provided as a standard OIDC claim |
Recommended mapping:
sub                 → User ID / External ID
email               → Email
given_name          → First Name
family_name         → Last Name
name                → Display Name
preferred_username  → Username / Login
Important: Use sub as the stable identifier
The sub claim identifies the authenticated subject.
For multi-tenant scenarios, do not assume that an email address or username is the best permanent identifier. Follow your application's identity model and Microsoft Entra's claim semantics.
Microsoft documents the available OIDC claims in OpenID Connect on the Microsoft identity platform.
Click Continue.
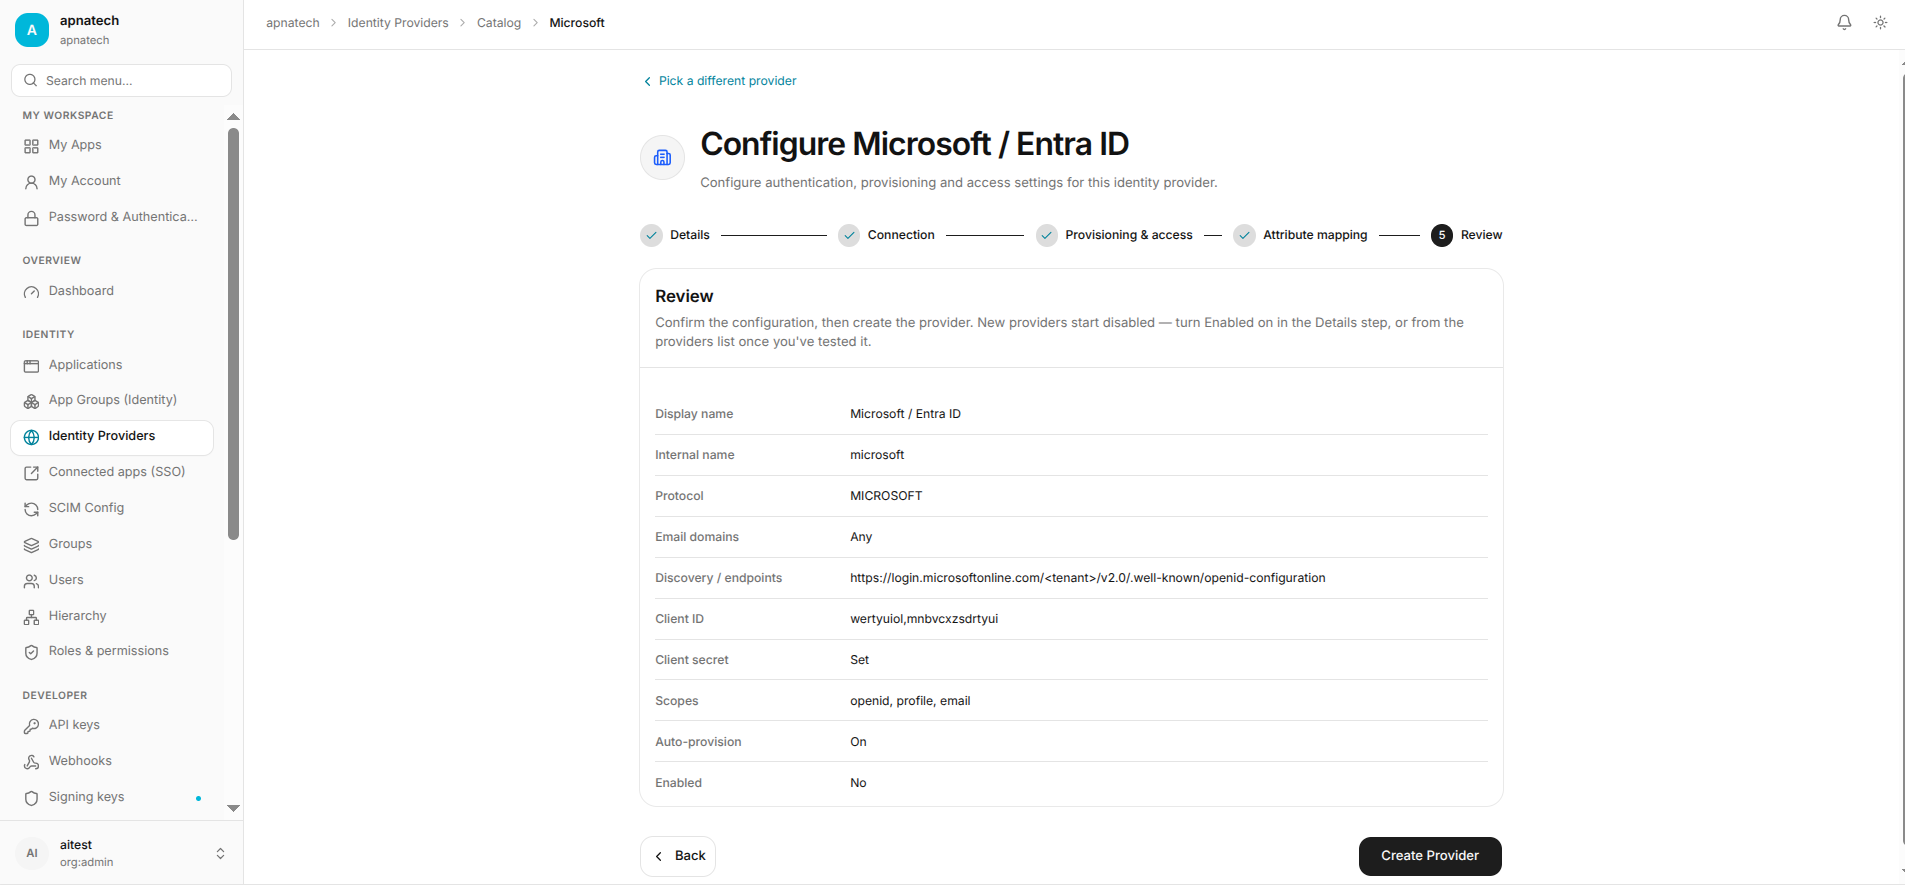
Step 8: Review
The Review step displays the configuration before the Identity Provider is saved.
Verify the following.
Details
- Provider name is correct.
- Provider type is OIDC.
- Provider is enabled if required.
Connection
- Tenant value is correct.
- Discovery URL is correct.
- Client ID matches the Microsoft Entra application registration.
- Client Secret is correct.
- Scopes include
openid. - Redirect URI is configured in Microsoft Entra ID.
Provisioning & access
- The correct users or groups have access.
- JIT provisioning is configured according to your requirements.
- Existing-user matching is configured correctly.
Attribute mapping
Verify:
sub                 → User ID / External ID
email               → Email
given_name          → First Name
family_name         → Last Name
name                → Display Name
preferred_username  → Username / Login
Select Save, Create, or Finish, depending on your application's UI.
Step 9: Test Microsoft Entra OIDC Login
After saving the configuration, test the authentication flow.
- Open the application's login page.
- Select Sign in with Microsoft or the configured Microsoft Entra ID provider.
- Microsoft displays the sign-in page.
- Sign in with an allowed Microsoft account.
- Microsoft redirects the user to the application's Redirect URI.
- The application validates the OIDC response.
- The application creates or signs in the user.
- Verify that the user's attributes were populated correctly.
Expected result
After successful authentication:
- The user is redirected back to the application.
- The user is authenticated.
- The expected Microsoft Entra claims are mapped to application attributes.
- The user receives the access configured in Provisioning & access.
Troubleshooting
AADSTS50011 - Redirect URI mismatch
This error usually means the Redirect URI in Microsoft Entra ID does not match the Redirect URI sent by the application.
Check:
- Protocol (
httpvshttps) - Domain
- Port
- Path
- Trailing slash
- Environment-specific callback URL
Open:
Entra ID → App registrations → Your application → Authentication
Then verify the configured Redirect URI.
See Microsoft's Redirect URI documentation.
invalid_client
Check that:
- The Client ID is correct.
- The Client Secret value is correct.
- The secret has not expired.
- The application registration belongs to the expected Microsoft Entra tenant.
- The application is using the correct tenant authority.
If the client secret has expired, create a new secret under:
Certificates & secrets → Client secrets → New client secret
unauthorized_client
Check the Supported account types configured for the Microsoft Entra application.
For example, an application registered as single-tenant cannot normally be used by users from unrelated tenants.
Review the Microsoft documentation for Supported account types.
User is authenticated but not created
Check Provisioning & access.
If JIT provisioning is enabled, verify that the authenticated user is allowed to access the application.
If users must be assigned manually, verify the user's assignment/access.
Email or name is missing
Check the attribute mappings:
email               → Email
given_name          → First Name
family_name         → Last Name
name                → Display Name
preferred_username  → Username / Login
Also verify that the requested OIDC scopes include:
openid profile email
Discovery URL does not work
Verify that the tenant value is correct.
For a tenant-specific configuration:
https://login.microsoftonline.com/<tenant-id>/v2.0/.well-known/openid-configuration
For organization-wide sign-in:
https://login.microsoftonline.com/organizations/v2.0/.well-known/openid-configuration
For both organizational and personal Microsoft accounts:
https://login.microsoftonline.com/common/v2.0/.well-known/openid-configuration
Make sure the application's supported account type is compatible with the selected authority.