Configure Okta OIDC
This guide explains how to configure an application with Okta as an OpenID Connect (OIDC) Identity Provider (IdP).
The configuration is completed in the application using the following steps:
- Details
- Connection
- Provisioning & access
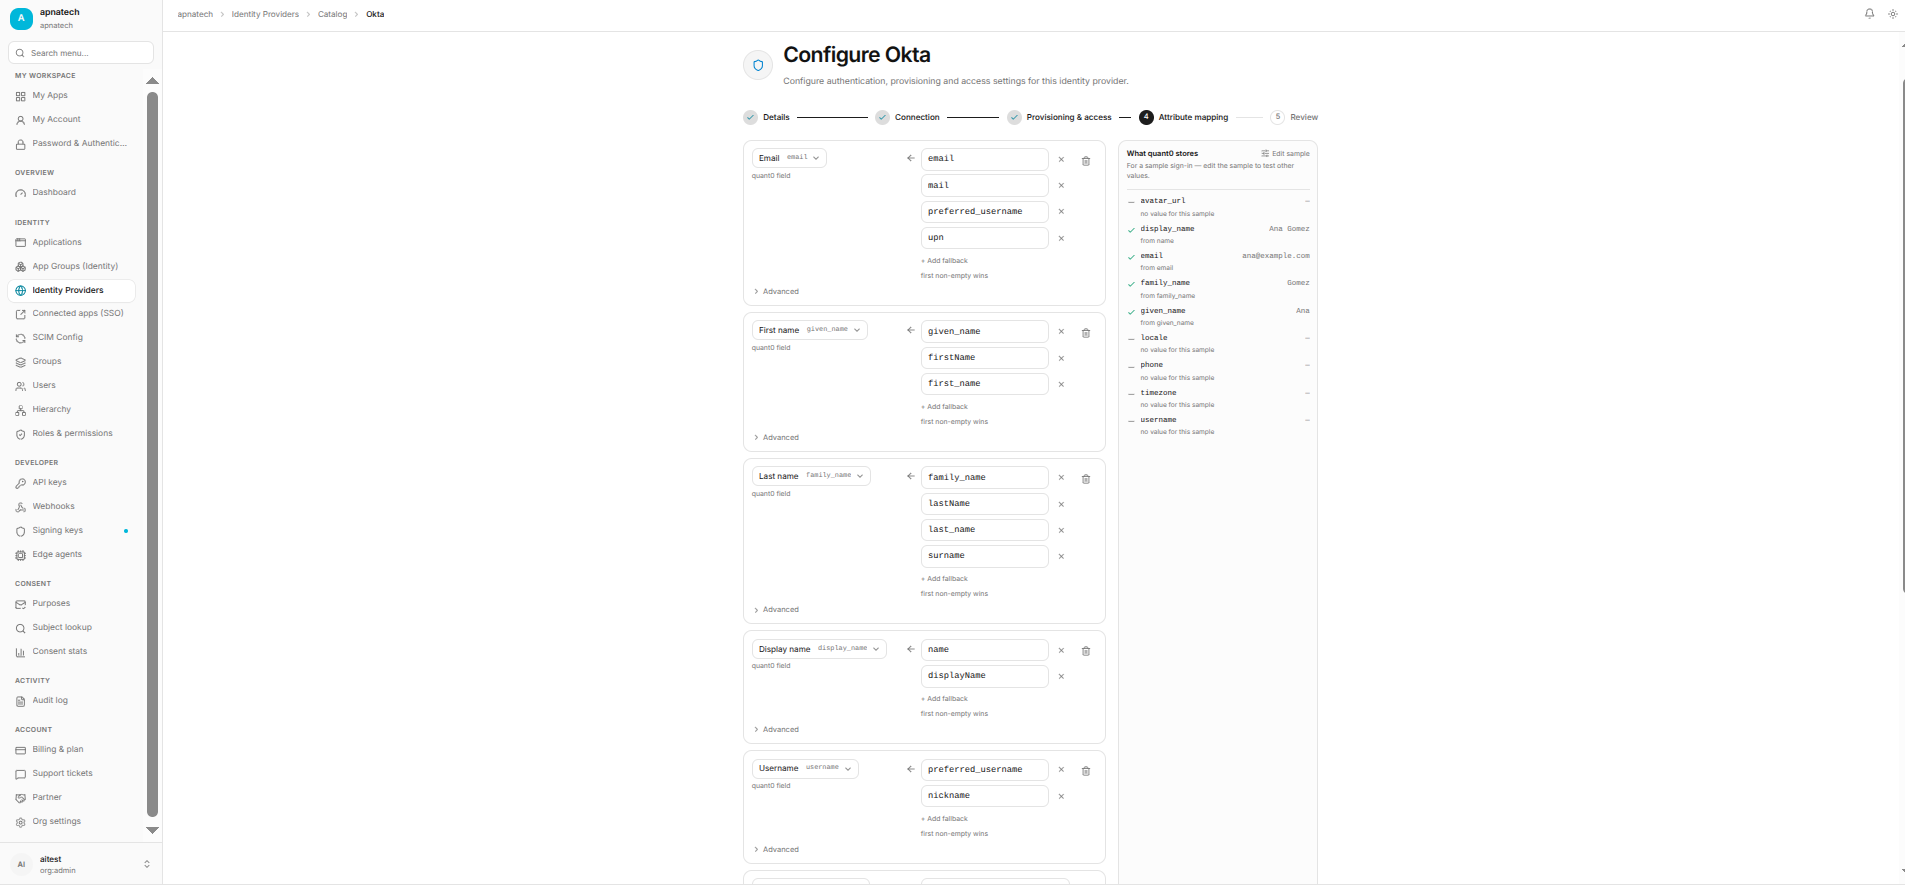
- Attribute mapping
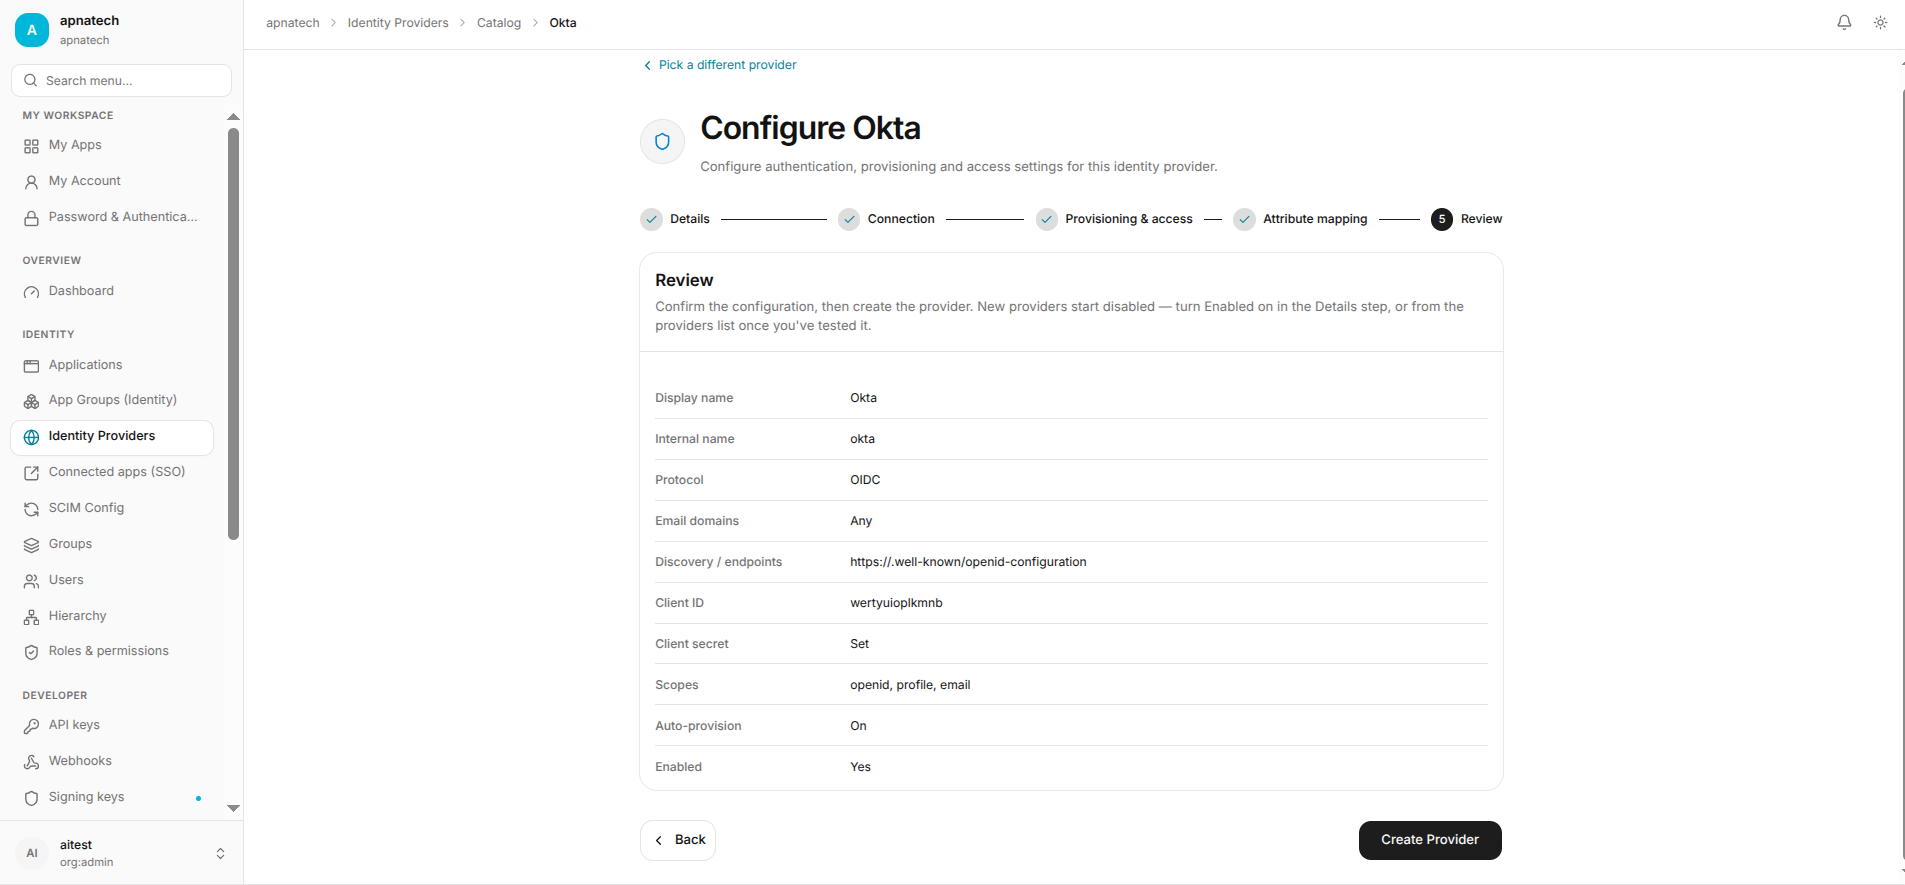
- Review
Prerequisites
Before configuring Okta OIDC, make sure you have:
- Access to the application with permission to configure Identity Providers.
- An Okta organization with administrator access.
- Access to the Okta Admin Console.
- The application's Redirect URI / Callback URL.
- The user attributes required by your application.
See the Okta OpenID Connect .
Step 1: Create an OIDC Application in Okta
First, create an OIDC application integration in Okta.
1.1 Open the Okta Admin Console
Sign in to the Okta Admin Console.
Go to:
Applications → Applications → Create App Integration
See Create an app integration.
1.2 Select OIDC
Configure:
| Field | Value |
|---|---|
| Sign-in method | OIDC - OpenID Connect |
| Application type | Web Application |
Select Next.
For a server-side web application, select Web Application. For a browser-based SPA, use the Single-Page Application configuration.
Step 2: Configure the Okta Application
2.1 Enter the application name
Enter a recognizable name.
Example:
My Application
2.2 Configure the Grant Type
For a standard Okta OIDC web application, use:
Authorization Code
Okta documents Authorization Code for web applications in Implement authorization by grant type.
Step 3: Configure Redirect URIs
The Redirect URI is where Okta sends the user after authentication.
3.1 Sign-in Redirect URI
In Sign-in redirect URIs, enter the exact callback URL provided by your application.
Example:
https://<your-application-domain>/<your-oidc-callback-path>
For local development:
http://localhost:3000/login/callback
The URI must exactly match the value used by your application.
3.2 Sign-out Redirect URI
If logout redirection is supported, configure:
https://<your-application-domain>/
For local development:
http://localhost:3000
See Sign users in to your web app using the redirect model.
Step 4: Configure Access
In Controlled access, choose who can access the application.
Typical options include:
- Everyone in the organization.
- Specific groups.
- Specific users.
- A custom access policy.
Select the option that matches your organization's requirements.
Select Save.
Step 5: Get Client ID and Client Secret
After creating the OIDC application, go to:
Applications → Applications → Your Application → General
In Client Credentials, copy:
- Client ID
- Client Secret
Example:
Client ID:
0oaXXXXXXXXXXXXXXX

Client Secret:
XXXXXXXXXXXXXXXXXXXXXXXX
Okta confirms these credentials are available under General → Client Credentials in its web application guide: Okta web application OIDC guide.
Step 6: Find the Okta Issuer
The issuer identifies the Okta authorization server.
For the default custom authorization server, the issuer normally has this format:
https://<yourOktaDomain>/oauth2/default
Example:
https://dev-123456.okta.com/oauth2/default
See Okta Authorization Servers.
Step 7: Configure OIDC Discovery
If the application supports an OIDC Discovery URL, use:
https://<yourOktaDomain>/oauth2/default/.well-known/openid-configuration
For the Okta organization authorization server:
https://<yourOktaDomain>/.well-known/openid-configuration
Use the discovery URL corresponding to the issuer configured for your application.
OIDC discovery provides the authorization endpoint, token endpoint, JWKS endpoint, UserInfo endpoint, and other provider metadata.
Step 8: Configure the Identity Provider in the Application
Open the application's Identity Providers section and create a new provider.
Select:
Identity Provider → OIDC → Okta
The configuration wizard opens.
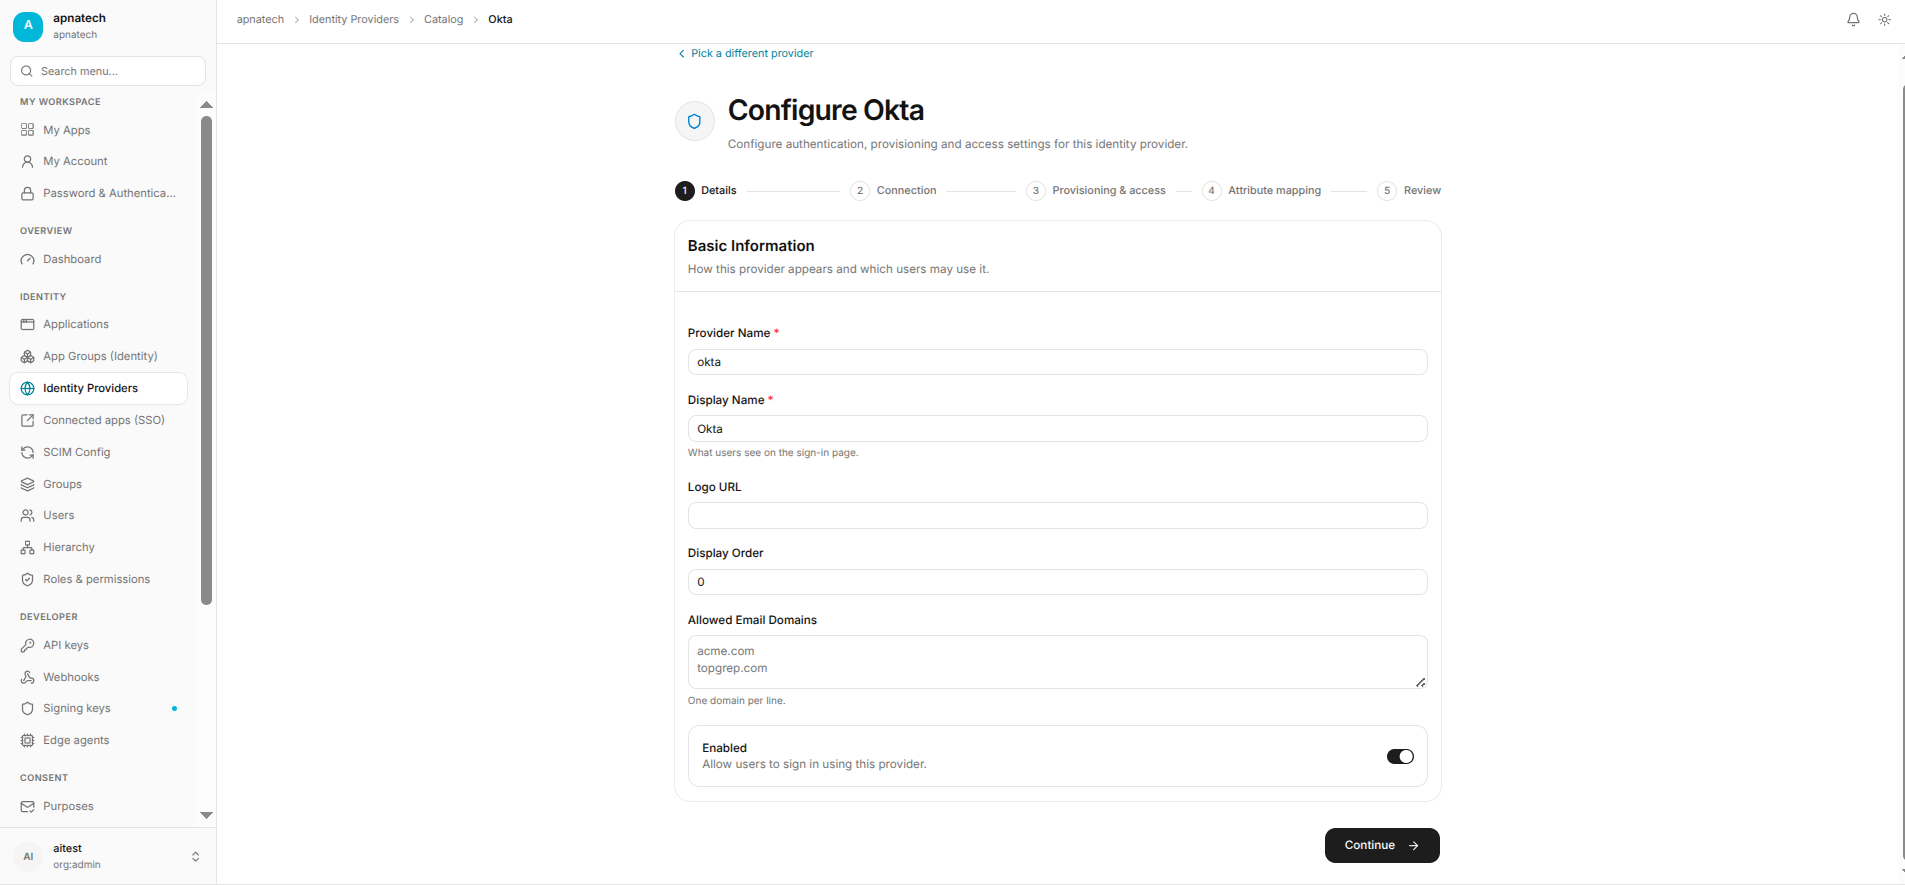
Step 8.1: Details
| Field | Value |
|---|---|
| Name | Okta |
| Provider type | OIDC |
| Description | Okta OpenID Connect |
Enable the provider if your application provides an Enabled option.
Click Continue.
Step 9: Connection
The Connection step contains the Okta OIDC settings.
9.1 Configure the Issuer
Enter:
https://<yourOktaDomain>/oauth2/default
Replace <yourOktaDomain> with your actual Okta domain.
9.2 Configure OIDC endpoints
For the default custom authorization server:
| Application field | Okta OIDC value |
|---|---|
| Issuer | https://<yourOktaDomain>/oauth2/default |
| Discovery URL | https://<yourOktaDomain>/oauth2/default/.well-known/openid-configuration |
| Authorization Endpoint | https://<yourOktaDomain>/oauth2/default/v1/authorize |
| Token Endpoint | https://<yourOktaDomain>/oauth2/default/v1/token |
| UserInfo Endpoint | https://<yourOktaDomain>/oauth2/default/v1/userinfo |
| JWKS Endpoint | https://<yourOktaDomain>/oauth2/default/v1/keys |
| Client ID | Client ID from Okta |
| Client Secret | Client Secret from Okta |
| Scopes | openid profile email |
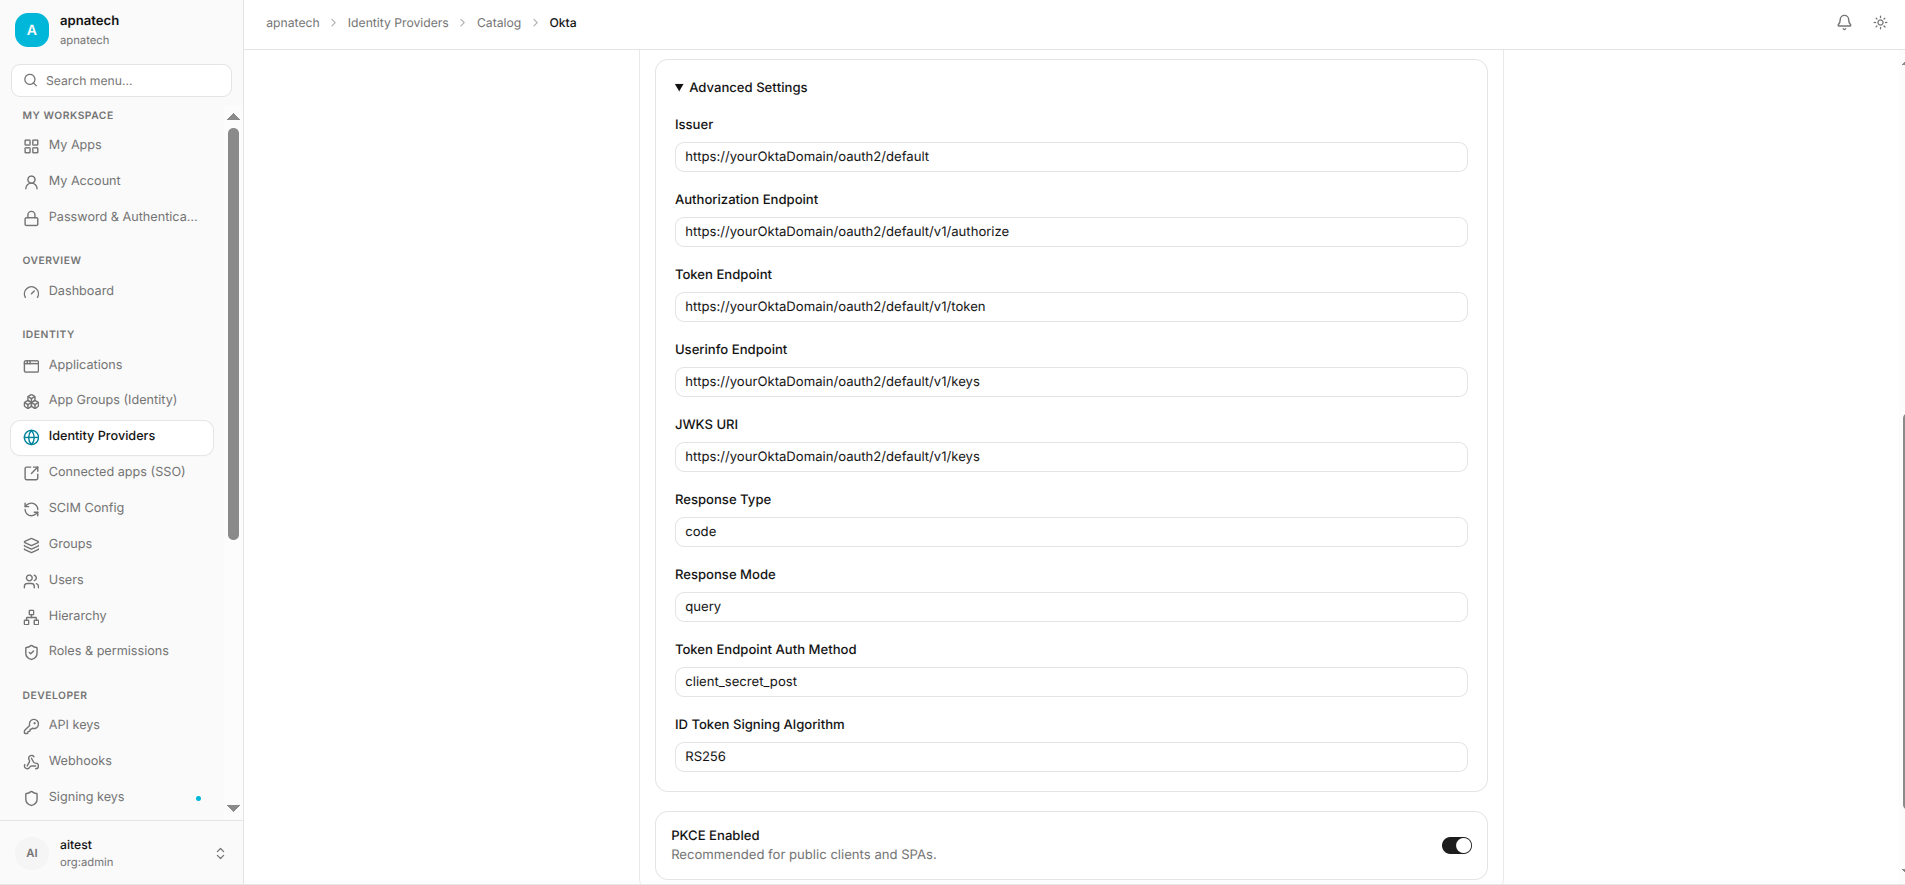
When possible, use the discovery URL instead of manually entering endpoints.
See Okta OpenID Connect & OAuth 2.0.
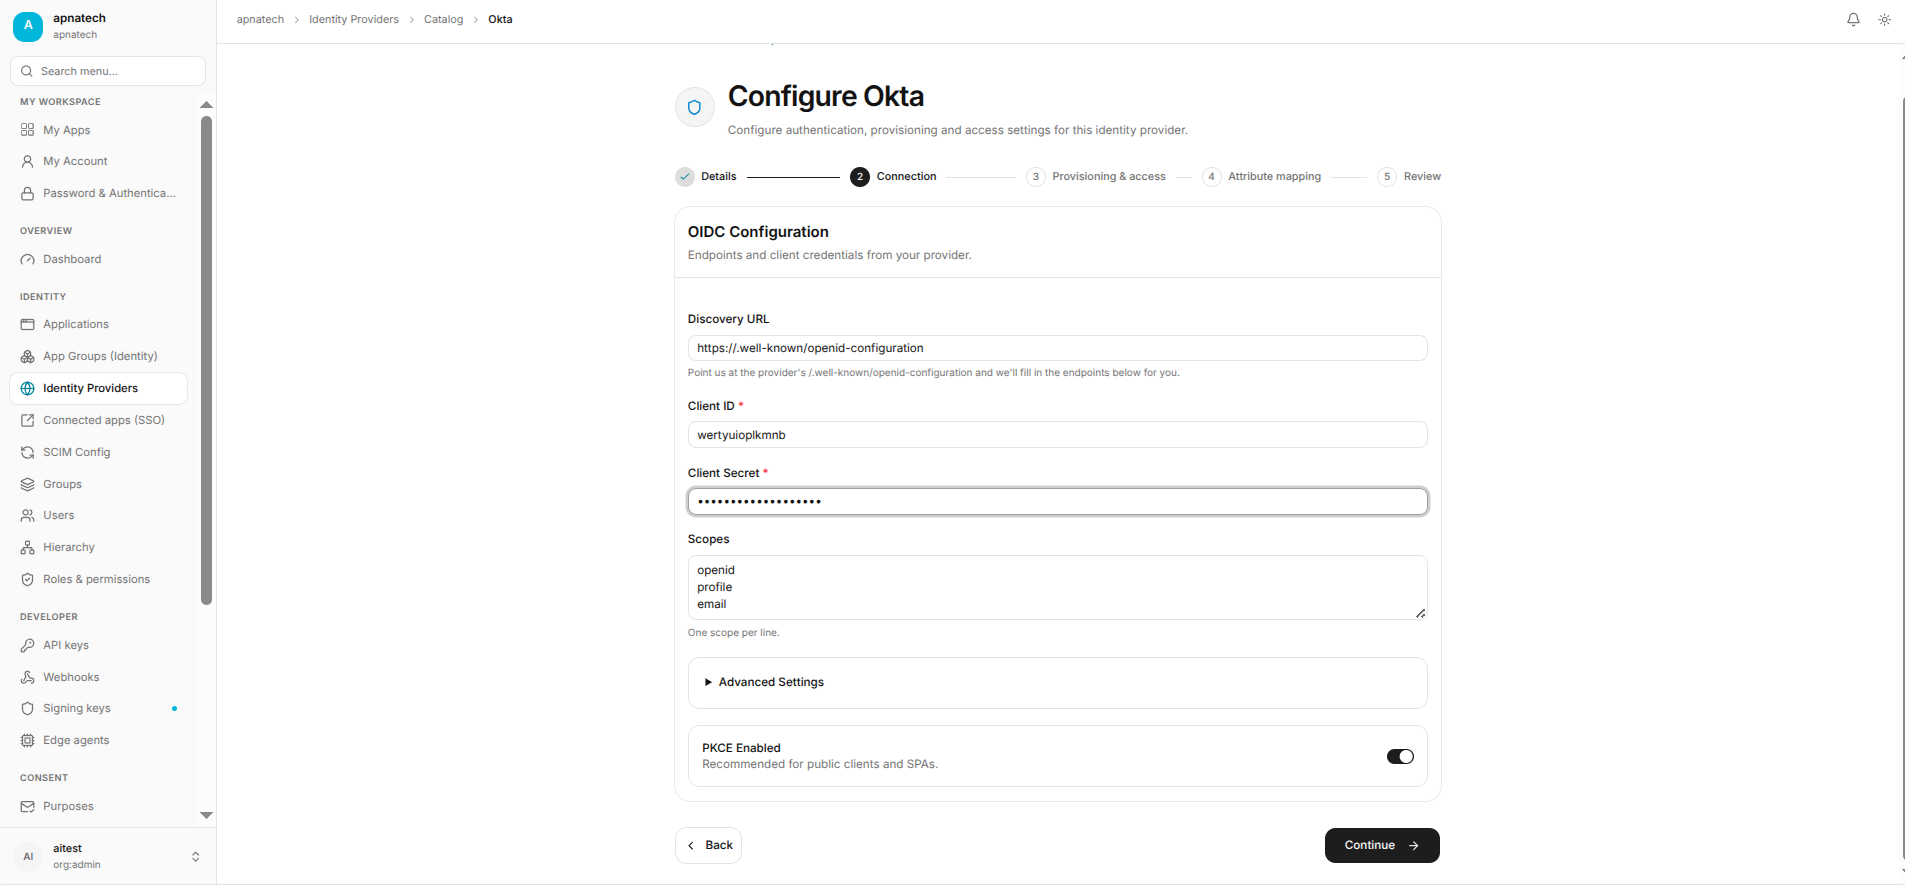
9.3 Configure Scopes
Use:
openid profile email
openidenables OpenID Connect authentication.profilerequests standard profile claims.emailrequests email-related claims.
Click Continue.
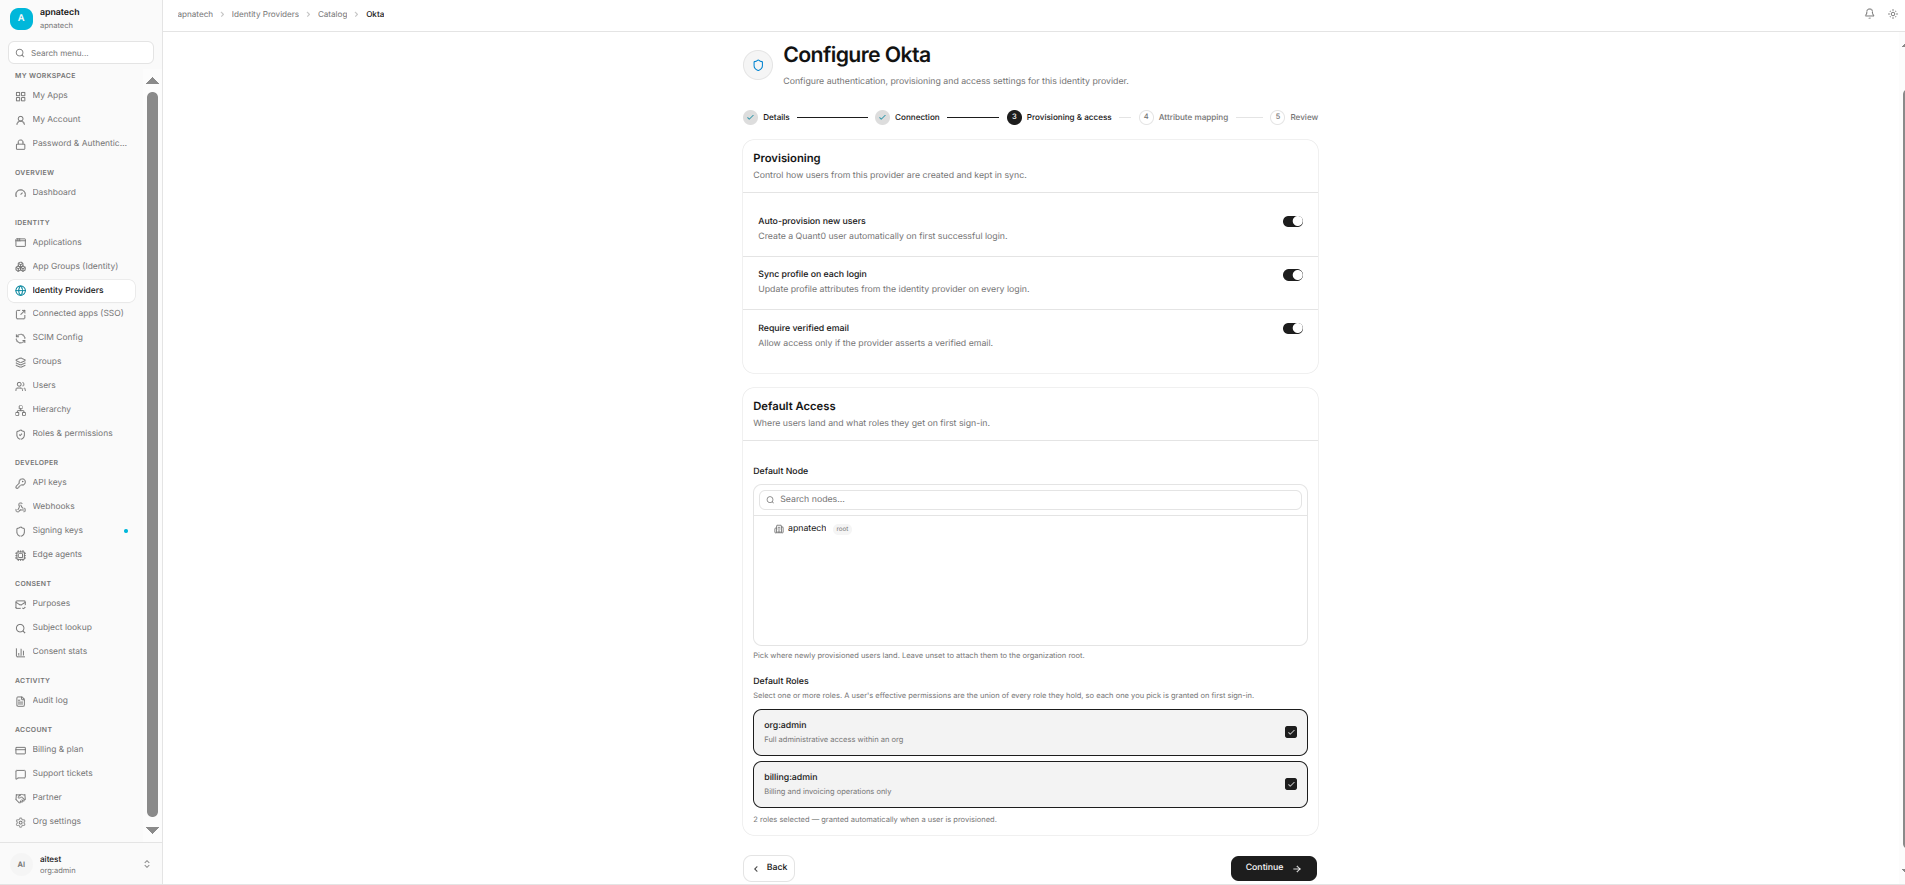
Step 10: Provisioning & Access
Configure which users can use Okta and how users are created or matched.
| Setting | Recommended configuration |
|---|---|
| Provider status | Enabled |
| User access | Allow required users/groups |
| Account creation | Enable if JIT provisioning is supported |
| Existing user matching | Use a stable identifier or supported email matching |
Just-in-time provisioning
If supported, JIT provisioning can create a user automatically the first time they authenticate through Okta.
If disabled, users may need to be created or assigned manually.
Click Continue.
Step 11: Attribute Mapping
Map Okta OIDC claims to application attributes.
| Application attribute | Okta OIDC claim | Purpose |
|---|---|---|
| User ID / External ID | sub | Stable subject identifier |
email | User email | |
| First name | given_name | First name |
| Last name | family_name | Last name |
| Display name | name | Display name |
| Username | preferred_username | Login identifier |
Recommended mapping:
sub                 → User ID / External ID
email               → Email
given_name          → First Name
family_name         → Last Name
name                → Display Name
preferred_username  → Username / Login
Use a stable identity claim for user matching. Do not use a display name as a unique identifier.
See Okta OIDC claims and scopes.
Click Continue.
Step 12: Review
Before saving, verify:
Details
- Provider name is correct.
- Provider type is OIDC.
- Provider is enabled if required.
Connection
- Okta domain is correct.
- Issuer is correct.
- Discovery URL is correct.
- Client ID is correct.
- Client Secret is correct.
- Scopes include
openid.
Provisioning & access
- Correct users/groups have access.
- JIT provisioning is configured correctly.
- Existing-user matching is configured correctly.
Attribute mapping
sub                 → User ID / External ID
email               → Email
given_name          → First Name
family_name         → Last Name
name                → Display Name
preferred_username  → Username / Login
Select Save, Create, or Finish.
Step 13: Test Okta OIDC Login
- Open the application's login page.
- Select Sign in with Okta.
- Sign in with an allowed Okta account.
- Okta redirects the user to the application's Sign-in Redirect URI.
- The application validates the OIDC response.
- The application creates or signs in the user.
- Verify that the mapped user attributes are correct.
Expected result
- The user is redirected back to the application.
- Authentication succeeds.
- Okta claims are mapped to application attributes.
- The user receives the configured application access.
Troubleshooting
Redirect URI mismatch
Check:
- Protocol (
httpvshttps) - Domain
- Port
- Path
- Trailing slash
- Local vs production callback URL
Verify the Sign-in redirect URIs under:
Applications → Applications → Your Application → General
See Okta redirect model documentation.
invalid_client
Check that:
- Client ID is correct.
- Client Secret is correct.
- Client Secret has not expired or been rotated.
- Credentials belong to the expected Okta application.
- Issuer is correct.
Token validation failure
Check:
- The issuer matches the token's
issclaim. - The application uses the correct JWKS endpoint.
- The token has not expired.
- The expected audience matches the OIDC client configuration.
OIDC ID tokens should always be validated according to the OIDC protocol.
User is authenticated but not created
Check Provisioning & access.
If JIT provisioning is enabled, verify that the user is allowed to access the application.
If users must be assigned manually, verify the user/group assignment in Okta.
Email or name is missing
Check:
email               → Email
given_name          → First Name
family_name         → Last Name
name                → Display Name
preferred_username  → Username / Login
Also verify:
openid profile email
are requested.
Discovery URL does not work
For the default custom authorization server:
https://<yourOktaDomain>/oauth2/default/.well-known/openid-configuration
For the Okta organization authorization server:
https://<yourOktaDomain>/.well-known/openid-configuration
Do not mix the issuer and discovery URL from different authorization servers.